Snowman Cheese Ball has been my go-to holiday appetizer ever since my kids were little. I remember the first time I made one; their eyes lit up with pure joy, and that festive cheese ball became an instant family tradition. There’s something so magical about transforming simple ingredients into such a whimsical, delicious centerpiece. This easy snowman cheese ball is not just a treat for the taste buds, but it’s also a delightful visual spectacle that brings smiles to every face. I’ve discovered it’s the perfect no-bake snowman appetizer for any Christmas gathering, and the creamy, savory flavors always disappear fast. Let’s get cooking!
Why You’ll Love This Snowman Cheese Ball
I know you’ll absolutely adore this Snowman Cheese Ball for so many reasons!
- It’s incredibly delicious, featuring a rich, creamy blend of cheeses that everyone adores.
- Prep time is a breeze; I can whip this up in about 20 minutes, making it perfect for busy holiday schedules.
- It’s a fantastic Christmas party cheese ball idea that truly stands out from other appetizers.
- This recipe is surprisingly budget-friendly, using common ingredients you likely already have.
- It’s a wonderful, interactive project for the whole family to help assemble, especially the decorating part.
- You’ll love how it serves as a festive centerpiece, sparking conversations at any gathering.
- This Snowman Cheese Ball is a delightful and unique Christmas party cheese ball idea that always gets rave reviews.
Ingredients for Snowman Cheese Ball
Here’s everything I gather to create this delightful Snowman Cheese Ball. Each ingredient plays a crucial role in making this festive cheese ball recipe taste amazing and hold its shape perfectly.
- 16 oz (450g) cream cheese, softened – This is the base for our creamy snowman shaped cheese appetizer. Make sure it’s very soft for easy mixing.
- 2 cups shredded sharp white cheddar cheese – Adds a fantastic tangy flavor and contributes to the firm texture of your holiday cheese spread snowman.
- 1/2 cup grated mozzarella or Monterey Jack cheese – For extra meltiness and a milder cheese note, creating a balanced cream cheese snowman dip.
- 1/2 teaspoon garlic powder – A subtle savory kick that enhances the cheese flavors.
- 1/2 teaspoon onion powder – Partners with garlic powder to give a classic savory depth.
- 1/4 teaspoon black pepper – Just a touch to round out the seasoning.
- 1–2 tablespoons chopped fresh chives or parsley (optional) – I sometimes add these for a hint of freshness and color.
- Salt to taste – Always adjust to your preference.
- Mini carrots or carrot slices (for the nose) – The iconic nose that brings your snowman to life!
- Whole peppercorns or black olives (for eyes and buttons) – These provide the perfect contrast for decorating.
- Thin red bell pepper strip (scarf) – Adds a vibrant, edible splash of color.
- 2 small pretzel sticks (arms) – For those charming, twig-like arms.
- Shredded mozzarella or finely grated white cheese (for coating) – This is what gives our Snowman Cheese Ball its snowy exterior.
How to Make Snowman Cheese Ball
Making this festive Snowman Cheese Ball is such a joy, and I promise it’s simpler than you think! Follow these steps, and you’ll have a delightful holiday centerpiece in no time.
- Step 1: First, ensure your cream cheese is wonderfully soft. In a large mixing bowl, combine the softened cream cheese, shredded sharp white cheddar, and grated mozzarella or Monterey Jack cheese. I love seeing the cheeses come together into a rich, creamy base.
- Step 2: Add your seasonings: the garlic powder, onion powder, black pepper, and a pinch of salt. If you’re using fresh chives or parsley, gently fold them in now. Mix everything thoroughly until all the ingredients are well incorporated and the mixture is smooth. I find a sturdy spatula or even my clean hands work best for this.
- Step 3: Now comes the fun part of building a snowman cheese ball! Divide your cheese mixture into two distinct portions. One portion should be noticeably larger than the other; this will form the snowman’s body. The smaller portion will be for the head.
- Step 4: Take each portion and roll it gently between your palms to form smooth, round balls. You want them to be as uniform and spherical as possible for the best snowman shape.
- Step 5: Next, prepare your “snow.” Place the shredded mozzarella or finely grated white cheese onto a plate. Carefully roll each cheese ball in this shredded cheese, ensuring it’s completely coated. This step gives our Snowman Cheese Ball that perfect frosty, snowy appearance.
- Step 6: Arrange your snowman on your chosen serving platter. Place the larger cheese ball at the bottom for the body. Gently position the smaller cheese ball on top to create the head. If needed, you can insert a toothpick or two discreetly through the center to secure them, especially if you’re transporting it.
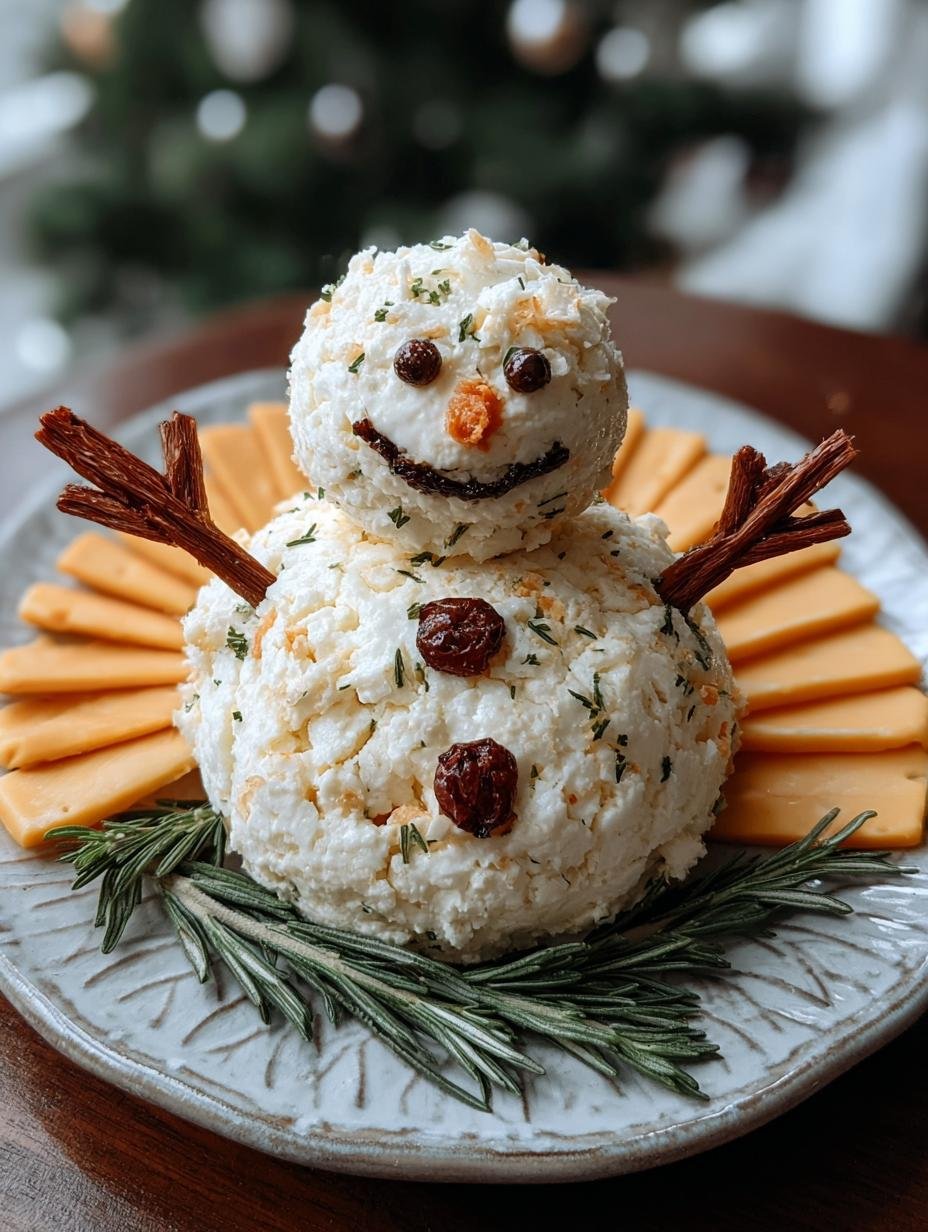
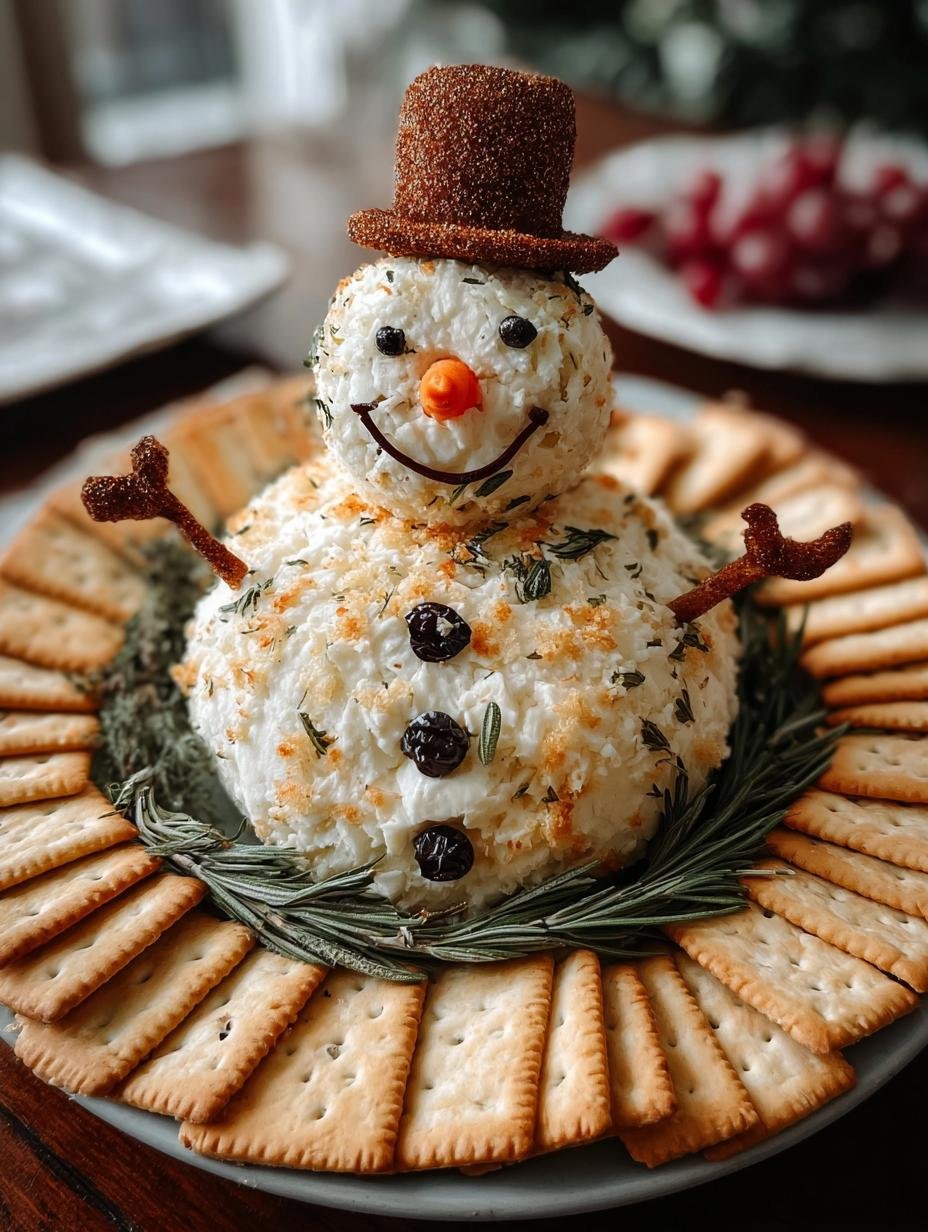
- Step 7: It’s time for decorating! Press a mini carrot or a small carrot slice into the smaller ball for the nose. Use whole peppercorns or small pieces of black olive for the eyes and buttons down the body of your snowman. Drape a thin strip of red bell pepper around the neck area to form a vibrant scarf. Finally, carefully insert two small pretzel sticks into the sides of the body for the arms. You’re truly building a snowman cheese ball!
- Step 8: To allow the flavors to meld and the cheese to firm up, refrigerate your decorated Snowman Cheese Ball for at least 1 hour. This chilling time ensures it holds its shape beautifully when served.
- Step 9: When you’re ready to serve, place your festive cheese ball on a platter surrounded by your favorite crackers, crostini, or fresh veggie sticks. Enjoy this delightful savory snowman snack!
Pro Tips for the Best Snowman Cheese Ball
I’ve learned a few tricks over the years that guarantee your Snowman Cheese Ball will be the star of any holiday gathering. These insider tips will help you create a truly impressive and delicious snowman shaped cheese appetizer.
- Always start with cream cheese that is truly at room temperature; this makes mixing and shaping incredibly easy and smooth.
- Don’t overmix the cheese mixture once all ingredients are added, as this can make it tough. Mix just until combined.
- For the smoothest “snowy” coating, use very finely grated white cheese or even powdered mozzarella.
- Chill your cheese balls thoroughly before decorating; this helps them hold their shape beautifully as you add the festive touches.
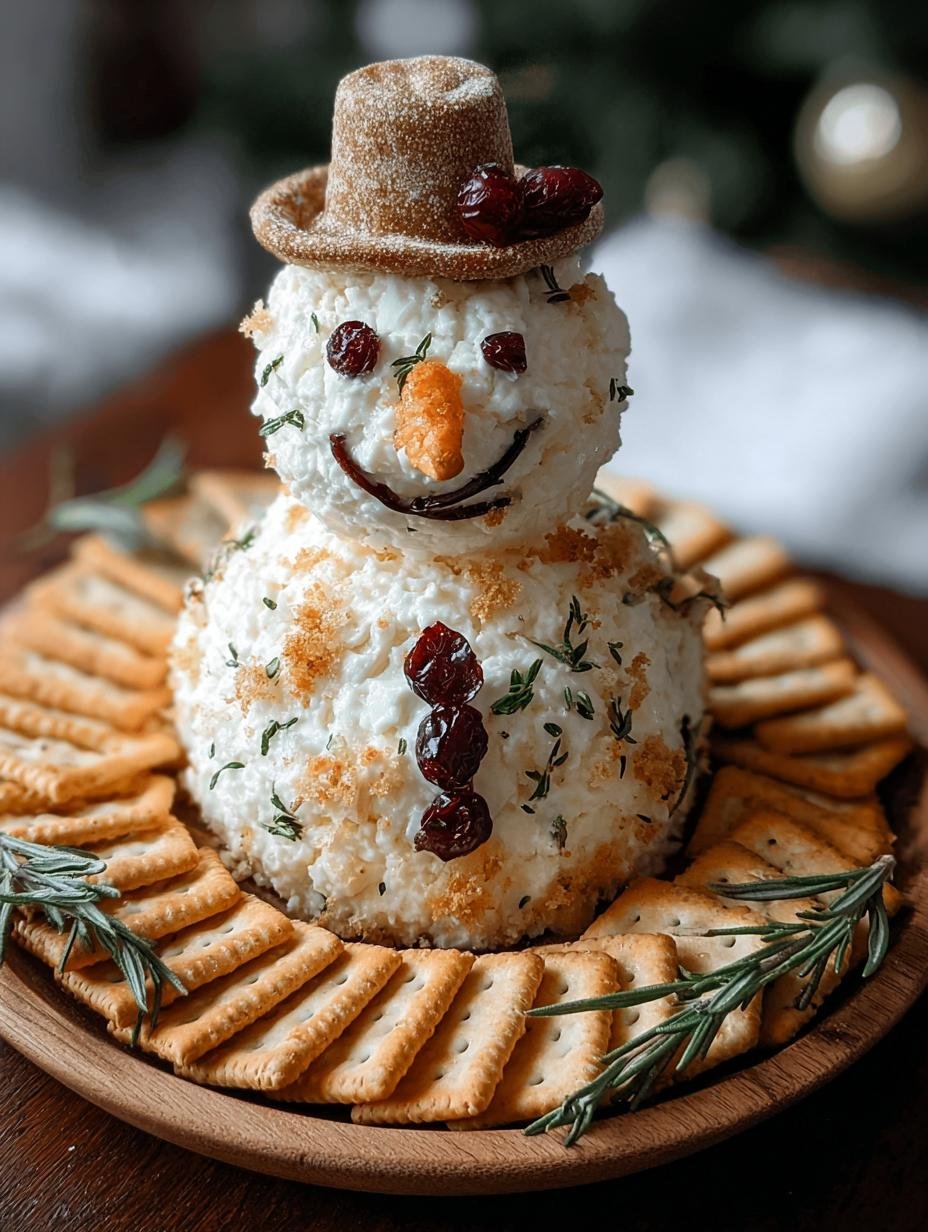
- Get creative with your snowman’s accessories! Rosemary sprigs make great festive arms, and small crackers can become a stylish hat.
What’s the secret to perfect Snowman Cheese Ball?
The real secret to a perfect Snowman Cheese Ball lies in using high-quality, softened cream cheese and ensuring a thorough chill time. This allows the flavors to meld beautifully and the structure to firm up, making your homemade snowman cheese ball easy to decorate and serve without it losing its charm. A good chill makes all the difference.
Can I make Snowman Cheese Ball ahead of time?
Absolutely! I often prepare my Snowman Cheese Ball up to 2-3 days in advance. Form the cheese balls, wrap them tightly in plastic, and store them in the refrigerator. I always wait to add the decorations like the carrot nose, pretzel arms, and bell pepper scarf until just an hour or two before serving to keep them fresh and crisp.
How do I avoid common mistakes with Snowman Cheese Ball?
To avoid common pitfalls with your Snowman Cheese Ball, first, ensure your cream cheese is soft to prevent lumps. Second, don’t skip the chilling step; it’s crucial for stability. Finally, use a light hand when decorating; too much pressure can distort the shape. A little patience goes a long way in building a snowman cheese ball that looks perfect.
Best Ways to Serve Snowman Cheese Ball
Once your delightful Snowman Cheese Ball is chilled and beautifully decorated, it’s time to present it to your eager guests! I love watching their faces light up when they see this festive cheese ball. Here are my favorite ways to serve this charming holiday appetizer with cheese.
First, arrange your snowman on a large, festive platter. Surround it with an assortment of dippers. Think classic crackers, crunchy pretzel crisps, or even toasted baguette slices. This provides a variety of textures for your guests to enjoy.
For a healthier option, I often include fresh vegetable sticks like carrot sticks, celery, and cucumber slices. The crispness of the veggies pairs wonderfully with the creamy cheese. This Snowman Cheese Ball truly makes for an impressive and delicious holiday appetizer with cheese that everyone will adore.
Nutrition Facts for Snowman Cheese Ball
I know many of you are curious about the nutritional breakdown of this festive treat. Here’s an estimate for one serving of my delicious Snowman Cheese Ball, based on the recipe making 10 servings:
- Serving Size: 1/10 of cheese ball
- Calories: 210
- Protein: 8g
- Fat: 18g
- Saturated Fat: 10g
- Unsaturated Fat: 8g
- Trans Fat: 0g
- Carbohydrates: 3g
- Fiber: 0g
- Sugar: 1g
- Sodium: 240mg
- Cholesterol: 45mg
Please remember that these nutritional values are estimates and can vary based on the specific brands and precise measurements of ingredients used in your homemade Snowman Cheese Ball.
How to Store and Reheat Snowman Cheese Ball
Proper storage is key to enjoying your delightful Snowman Cheese Ball beyond its initial presentation. After your holiday gathering, any leftover savory snowman snack should be handled with care to maintain its freshness and flavor.
First, always ensure your cheese ball is thoroughly cooled if it’s been at room temperature. Wrap it tightly in plastic wrap, making sure no air can get to the cheese. Then, place it in an airtight container. Stored this way, your Snowman Cheese Ball will stay fresh in the refrigerator for 3-4 days, perfect for continued snacking!
For longer storage, you can freeze the cheese ball. I recommend wrapping it first in plastic wrap, then in aluminum foil, and storing it in a freezer-safe bag. It will keep well in the freezer for up to 3 months. To enjoy again, simply thaw it overnight in the refrigerator. There’s no need to “reheat” this savory snowman snack; it’s best served chilled or at cool room temperature.
Frequently Asked Questions About Snowman Cheese Ball
What is a Snowman Cheese Ball?
A Snowman Cheese Ball is a festive and savory appetizer, typically made from a blend of cream cheese and other shredded cheeses, seasoned with herbs and spices. It’s molded into the shape of a snowman, often with two stacked balls, and then decorated with edible elements like carrot noses, olive eyes, and pretzel arms to resemble a classic snowman. It’s essentially a fun, edible centerpiece that doubles as a delicious dip for crackers and vegetables.
Can I use different types of cheese for my Snowman Cheese Ball?
Absolutely! I love experimenting with different cheeses to get unique flavor profiles. While cheddar and cream cheese are classics for a Snowman Cheese Ball, you can certainly substitute or add others. Consider using smoked gouda for a deeper flavor, or a spicy pepper jack if you like a little kick. Just make sure the cheeses you choose melt and blend well together to maintain that creamy consistency. This allows for a truly personalized festive cheese ball recipe.
What are the best dippers to serve with a Snowman Cheese Ball?
For a delightful Snowman Cheese Ball experience, I recommend offering a variety of dippers. Classic options include buttery crackers, sturdy pita chips, or toasted baguette slices. For healthier choices, colorful vegetable sticks like carrots, celery, cucumber, and bell pepper strips are fantastic. You could also include apple slices for a sweet and savory contrast. The goal is to have dippers that can stand up to the creamy texture of the cheese without breaking.
How can I make my Snowman Cheese Ball stand out even more?
To make your Snowman Cheese Ball truly memorable, get creative with the decorations! Besides the standard carrot nose and olive features, you can add a sprig of fresh rosemary as a “hat” or even use a small, festive cookie cutter to shape a piece of bell pepper into a star for a unique scarf. A sprinkle of finely chopped fresh parsley around the base can mimic snow. These little touches turn an already charming easy snowman cheese ball into an unforgettable holiday masterpiece.
Variations of Snowman Cheese Ball You Can Try
While my classic Snowman Cheese Ball recipe is a guaranteed hit, I love to experiment with variations to keep things fresh and exciting. These tweaks can cater to different tastes or dietary needs, making it an even more versatile fun holiday cheese appetizer.
For a spicier kick, you could try a “Jalapeño Popper Snowman.” Just finely dice some pickled jalapeños and mix them into the cheese base, perhaps with a touch of crumbled cooked bacon. If you’re looking for a lighter option, consider a “Greek Yogurt Snowman Cheese Ball” by replacing half the cream cheese with plain, thick Greek yogurt for a tangier, lower-fat version. For those who love sweet and savory, a “Cranberry Pecan Snowman” with dried cranberries and chopped pecans mixed in offers a delightful contrast. Each variation turns this into a uniquely delicious fun holiday cheese appetizer!
PrintAmazing Snowman Cheese Ball: 1 Magical Recipe

A fun and festive Christmas appetizer made from a creamy blend of cheeses shaped into an adorable snowman. Perfect for holiday parties, potlucks, or family gatherings, this show-stopping centerpiece is as delicious as it is decorative—ideal for dipping, spreading, or simply admiring!
- Prep Time: 20 minutes
- Cook Time: 0 minutes
- Total Time: 1 hour 20 minutes
- Yield: 1 large cheese ball (serves 8–10) 1x
- Category: Appetizer
- Method: No-Bake
- Cuisine: Christmas
- Diet: Vegetarian
Ingredients
- 16 oz (450g) cream cheese, softened
- 2 cups shredded sharp white cheddar cheese
- 1/2 cup grated mozzarella or Monterey Jack cheese
- 1/2 teaspoon garlic powder
- 1/2 teaspoon onion powder
- 1/4 teaspoon black pepper
- 1–2 tablespoons chopped fresh chives or parsley (optional)
- Salt to taste
- Mini carrots or carrot slices (for the nose)
- Whole peppercorns or black olives (for eyes and buttons)
- Thin red bell pepper strip (scarf)
- 2 small pretzel sticks (arms)
- Shredded mozzarella or finely grated white cheese (for coating)
- Optional: dried cranberries, fresh rosemary sprigs, or crackers for the serving tray
Instructions
- In a large bowl, combine cream cheese, cheddar, mozzarella, garlic powder, onion powder, pepper, and salt. Fold in herbs if using.
- Divide the mixture into two portions—one larger for the body and one smaller for the head. Roll each into a smooth ball.
- Roll both balls in shredded mozzarella or finely grated cheese to create a “snowy” look.
- Place the larger ball on a platter and gently set the smaller one on top. Secure with toothpicks if needed.
- Add a carrot nose, peppercorn eyes and buttons, pretzel arms, and a bell pepper scarf.
- Refrigerate for at least 1 hour before serving. Serve with crackers, crostini, or veggie sticks.
Notes
- Use very soft cream cheese for easy mixing and shaping.
- Chill the cheese mixture before decorating if your kitchen is warm.
- For a smooth snowy finish, use finely grated mozzarella for coating.
- Make ahead up to 3 days and decorate just before serving.
- Get creative with decorations—add rosemary “arms” or a cracker “hat”.
Nutrition
- Serving Size: 1/10 of cheese ball
- Calories: 210
- Sugar: 1g
- Sodium: 240mg
- Fat: 18g
- Saturated Fat: 10g
- Unsaturated Fat: 8g
- Trans Fat: 0g
- Carbohydrates: 3g
- Fiber: 0g
- Protein: 8g
- Cholesterol: 45mg


Leave a Reply