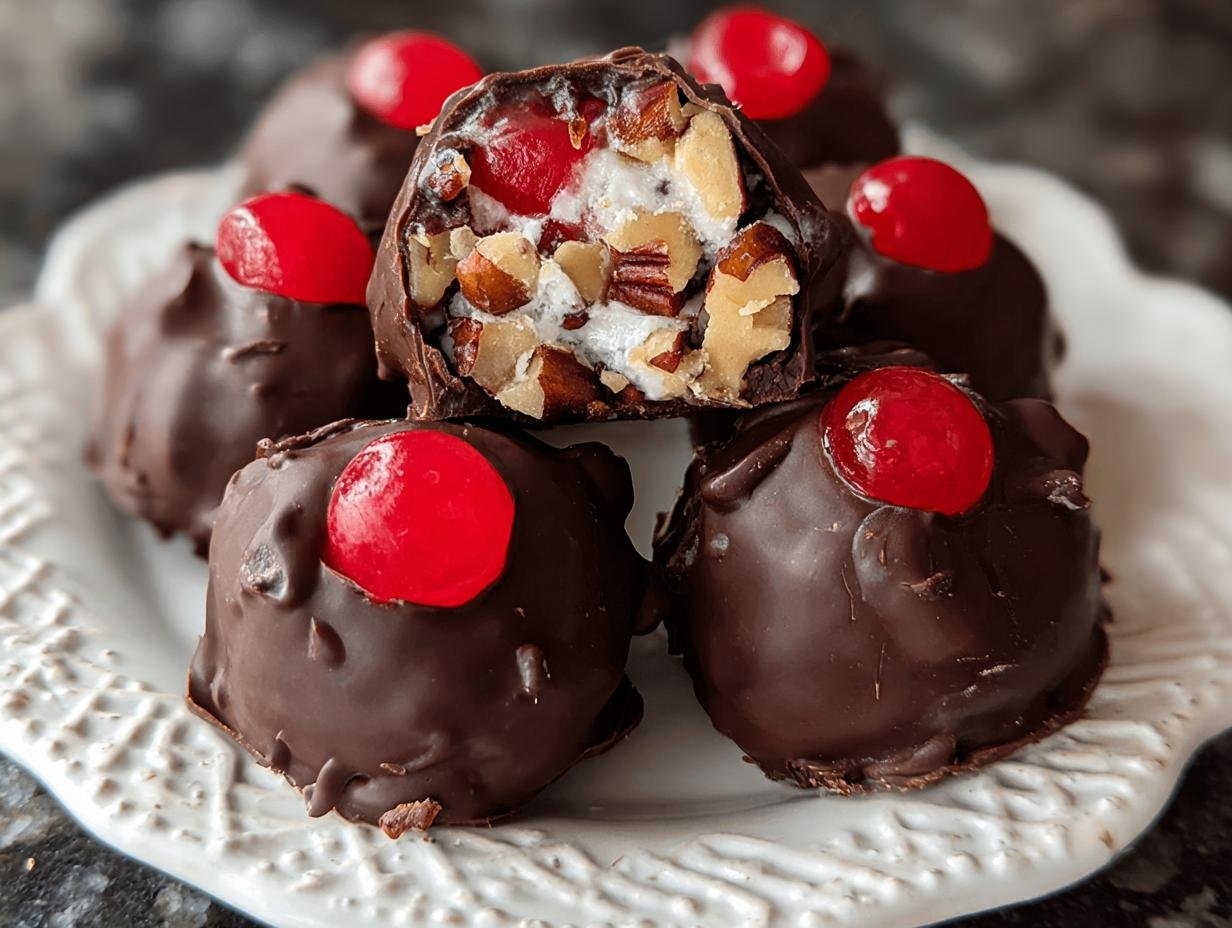
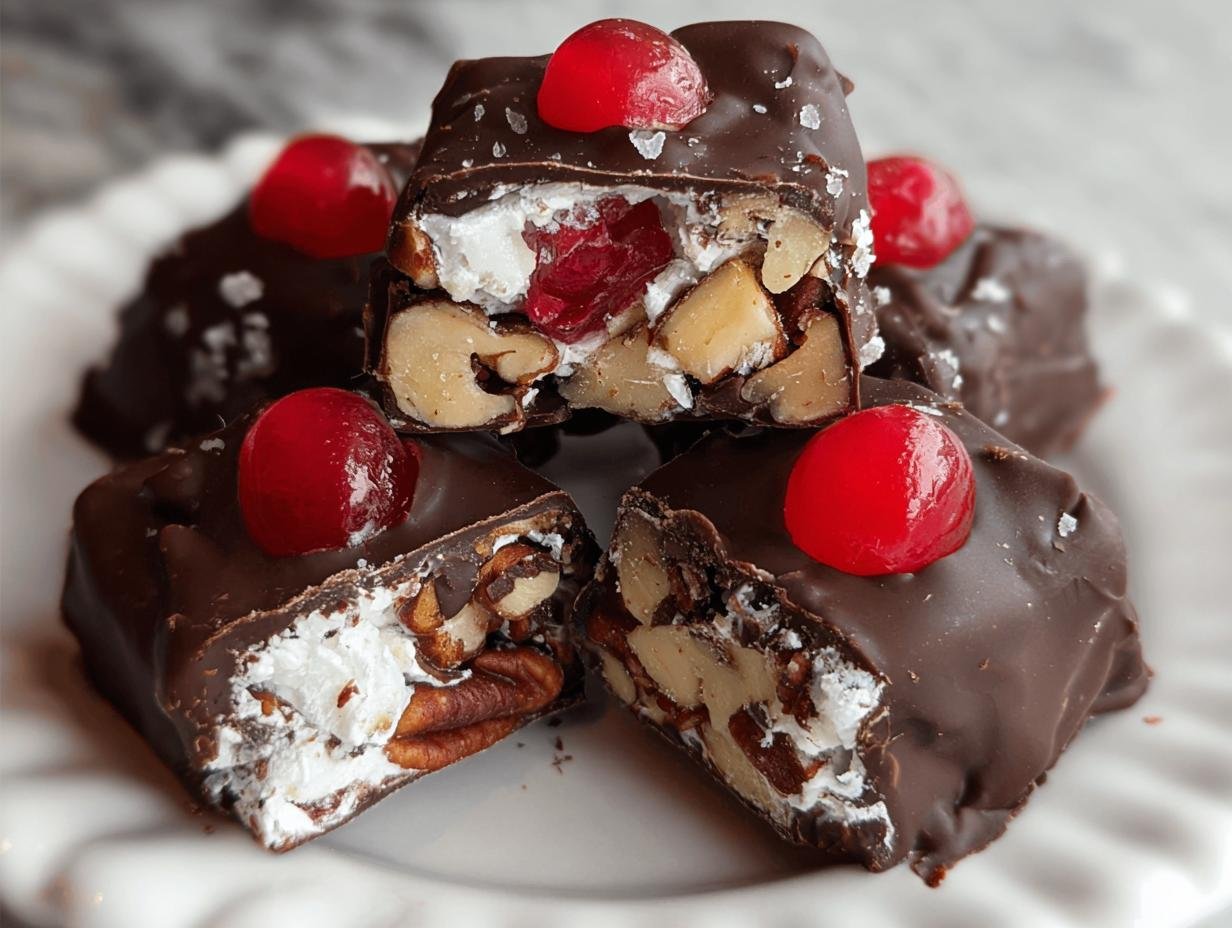
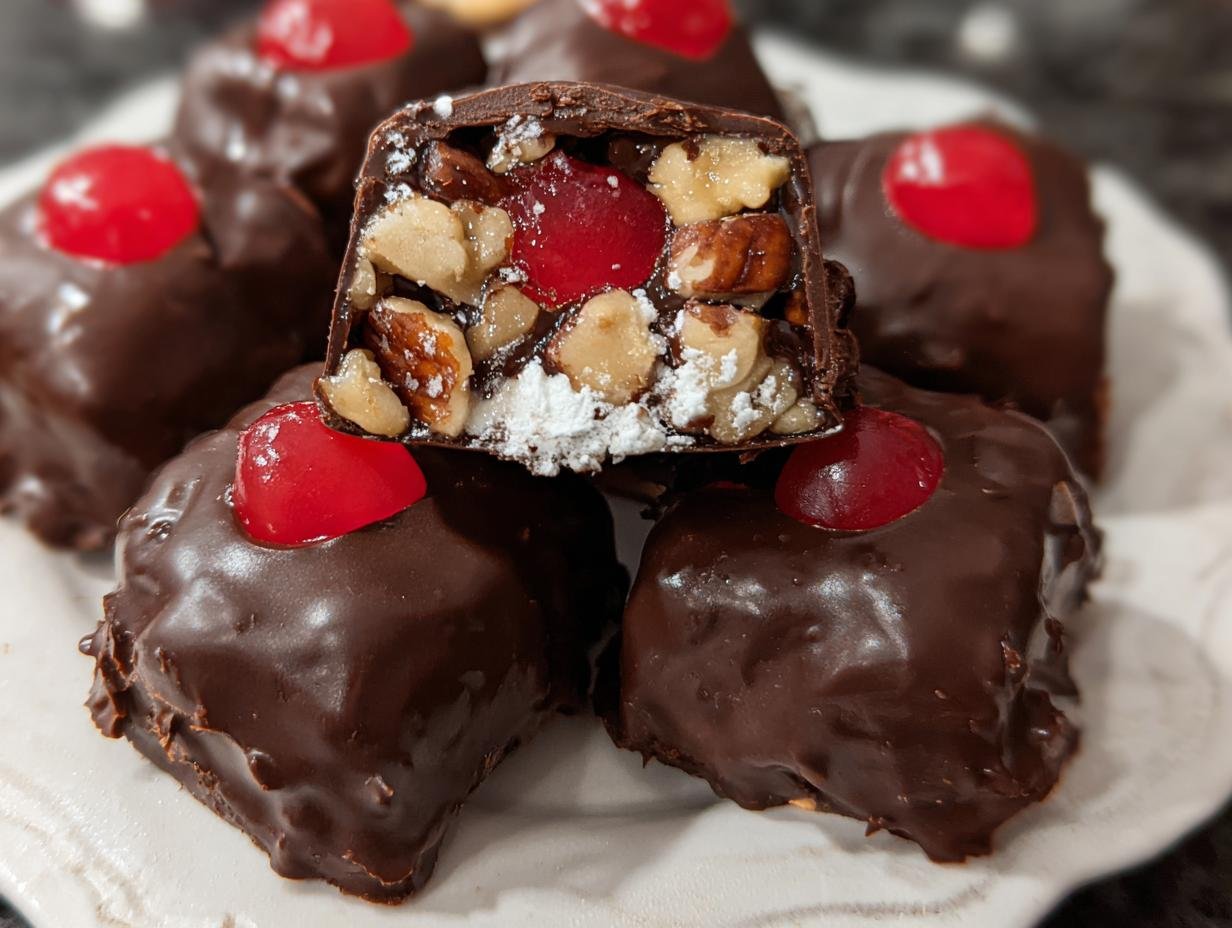
Martha Washington Candy has been a cherished holiday tradition in my family for generations. I still remember the sweet, nutty aroma filling my grandmother’s kitchen as she carefully dipped each delicate ball into glossy chocolate. It felt like pure magic! This old-fashioned confection, with its creamy coconut, cherry, and pecan center, is more than just a treat; it’s a taste of nostalgia. Making this traditional Martha Washington candy always brings back warm memories. If you’re looking for an impressive yet surprisingly simple dessert, this easy Martha Washington candy recipe is perfect. Let’s get cooking!
Why You’ll Love This Martha Washington Candy
Get ready to fall in love with this delightful treat! It’s truly the best way to satisfy your sweet cravings.
- Incredible Taste: A perfect balance of creamy, nutty, sweet, and fruity flavors that just melts in your mouth.
- Quick Prep Time: With only about an hour of active prep, you can whip up a batch of this delicious homemade Martha Washington candy easily.
- Budget-Friendly Sweet: Using common pantry staples makes this a very affordable indulgence.
- Family Fun: Rolling the balls is a fantastic activity for kids, making this a wonderful family-friendly homemade Martha Washington candy project.
- Impressive Presentation: These candies look as beautiful as they taste, perfect for holiday platters or thoughtful gifts.
- Versatile Treat: Enjoy them as a special dessert or a delightful afternoon pick-me-up.
Authentic Martha Washington Candy Ingredients
Gathering these key Martha Washington candy ingredients is the first step to creating this classic confection. The combination of creamy, nutty, and fruity elements is what makes this recipe so special and truly authentic.
- 1 cup unsalted butter, softened – This provides a rich, creamy base for the filling.
- 1 tablespoon vanilla extract – Adds that warm, comforting aroma and flavor essential for homemade treats.
- 1 (14-ounce) can sweetened condensed milk – This magical ingredient binds everything together and adds sweetness and moisture.
- 4 cups powdered sugar – Essential for creating that signature smooth, melt-in-your-mouth texture.
- 14 ounces sweetened shredded coconut – Contributes a lovely chewiness and tropical sweetness.
- 10-ounce jar maraschino cherries, drained and chopped – These little gems add pops of bright color and a delightful tartness.
- 3 cups pecans, chopped – For that classic nutty crunch that defines Martha Washington candy.
- 6 cups semi-sweet chocolate chips – The foundation for our luscious outer coating.
- 4 tablespoons shortening – Added to the chocolate, this ensures a smooth, glossy coating that sets up beautifully.
How to Make Martha Washington Candy
Now comes the fun part: learning how to make Martha Washington candy! This process is straightforward, and the results are absolutely divine. Get ready to impress everyone with these beautiful, homemade confections.
- Step 1: Begin by preparing the filling. In a large mixing bowl, beat together 1 cup unsalted butter, softened, 1 tablespoon vanilla extract, and 1 (14-ounce) can sweetened condensed milk until the mixture is wonderfully smooth and creamy. This forms the luscious base of our candy.
- Step 2: Gradually add 4 cups powdered sugar to the butter mixture. Mix until it’s fully incorporated and you have a thick, pliable dough.
- Step 3: Gently fold in the 14 ounces sweetened shredded coconut, the drained and chopped 10-ounce jar maraschino cherries, and the 3 cups chopped pecans. Stir until everything is evenly distributed throughout the mixture. You’ll see those beautiful pops of red and white!
- Step 4: Cover the bowl tightly with plastic wrap and refrigerate the filling for 1 to 2 hours. This chilling time is crucial for firming up the mixture so you can easily shape it.
- Step 5: Line two baking sheets with parchment paper. This prevents sticking and makes cleanup a breeze.
- Step 6: Once chilled, use a 1½ tablespoon scoop or a melon baller to shape the mixture into uniform balls. Place these shaped candies onto the prepared baking sheets.
- Step 7: Return the baking sheets with the shaped balls to the refrigerator and chill until they are firm again, about another 30 minutes. This ensures they hold their shape when dipping.
- Step 8: While the balls are chilling, prepare the chocolate coating. In a microwave-safe bowl, combine 6 cups semi-sweet chocolate chips and 4 tablespoons shortening.
- Step 9: Microwave the chocolate mixture in 30-second intervals, stirring well after each interval, until it’s completely melted and smooth. The shortening helps create a glossy finish for your Martha Washington chocolate drops.
- Step 10: Now, it’s time to dip! Take a firm candy ball and dip it into the melted chocolate using a fork, ensuring it’s fully coated. Let any excess chocolate drip back into the bowl. This is how to make Martha Washington candy look professionally done.
- Step 11: Carefully place the chocolate-coated candy back onto the parchment-lined tray. Repeat this dipping process for all the chilled balls.
- Step 12: Once all candies are dipped, refrigerate the trays until the chocolate coating is completely set. This usually takes about 30-60 minutes. Your beautiful Martha Washington chocolate drops are now ready to be enjoyed!
Pro Tips for the Best Martha Washington Candy
Want to make sure your homemade Martha Washington candy turns out absolutely perfect every time? I’ve learned a few tricks over the years that really make a difference. These simple tips will help you achieve that classic, melt-in-your-mouth texture and beautiful presentation that everyone loves.
- Chill is Key: Don’t rush the chilling steps! Properly chilled filling makes shaping much easier and prevents the candies from melting while you work.
- Perfect Coating: For the smoothest chocolate coating, ensure your chocolate chips and shortening are combined well. Stirring every 30 seconds in the microwave prevents scorching.
- Dust Your Hands: If the filling is a little sticky when you’re rolling the balls, lightly dust your hands with powdered sugar. It makes shaping a breeze!
- Quality Ingredients Matter: Using good quality nuts and fresh coconut makes a noticeable difference in the final flavor of your Martha Washington confection recipe.
What’s the secret to perfect Martha Washington Candy?
The real secret to the best Martha Washington candy lies in the balance of textures and flavors, achieved through proper chilling and the right ratio of ingredients. Using sweetened condensed milk as a binder ensures a creamy, cohesive filling that holds its shape beautifully. For more information on the science behind baking and candy making, you can explore resources on kitchen science.
Can I make Martha Washington Candy ahead of time?
Absolutely! You can prepare the filling and even roll the balls a day or two in advance. Store the shaped balls on a parchment-lined tray in the refrigerator until you’re ready to dip them in chocolate. This is similar to how one might prepare components for a hearty ragu ahead of time.
How do I avoid common mistakes with Martha Washington Candy?
The most common pitfalls are overly sticky filling or a chocolate coating that seizes up. Make sure to chill the filling thoroughly, and if your chocolate seizes, try adding a teaspoon of vegetable oil or more shortening to loosen it. Understanding ingredient properties is key, much like when working with avocado for toast.
Best Ways to Serve Martha Washington Candy
These delightful confections are perfect for so many occasions! For a truly special holiday gathering, arrange them on a festive platter alongside other traditional treats. Imagine a beautiful spread featuring these old fashioned Martha Washington candy gems, perhaps with some sugar cookies and gingerbread. They also make a wonderful addition to a dessert buffet or as a sweet ending to a family dinner. For a more casual treat, simply enjoy one or two with a warm cup of coffee or tea – the creamy, nutty flavors complement beverages beautifully.
Martha Washington Candy Nutrition Facts
Understanding the nutritional profile helps in enjoying these delightful treats mindfully. Here’s an approximate breakdown per candy, based on the recipe yielding about 80 servings:
- Calories: 180
- Fat: 11g
- Saturated Fat: 6g
- Protein: 2g
- Carbohydrates: 20g
- Fiber: 1g
- Sugar: 16g
- Sodium: 25mg
Nutritional values are estimates and may vary based on specific ingredients used and serving size.
How to Store and Reheat Martha Washington Candy
Proper Martha Washington candy storage is key to keeping these delightful treats fresh and delicious. Once your candies have fully set after dipping, let them sit at room temperature for about 15-20 minutes to ensure the chocolate is completely firm. Then, carefully transfer them to an airtight container. For the best Martha Washington candy storage, place a layer of parchment paper between rows if you’re stacking them to prevent sticking.
You can keep your homemade Martha Washington candy in the refrigerator for 2 to 3 weeks, which helps maintain the chocolate’s firmness. If you need to store them for longer, the freezer is your best friend! Wrap them well to prevent freezer burn and they’ll keep for up to 3 months. To enjoy frozen candies, simply transfer them to the refrigerator to thaw overnight before serving. Reheating isn’t typically necessary for these no-bake treats; they are best enjoyed chilled or at room temperature.
Frequently Asked Questions About Martha Washington Candy
What are Martha Washington candies made of?
At their core, Martha Washington candies are a delightful mix of creamy, nutty, and fruity flavors. The classic filling includes sweetened condensed milk, butter, powdered sugar, shredded coconut, chopped pecans, and maraschino cherries. This mixture is then chilled, shaped into balls, and coated in smooth, melted chocolate. It’s a truly nostalgic confection!
Is the Martha Washington candy recipe difficult?
Not at all! This Martha Washington confection recipe is surprisingly easy, making it perfect for beginners or anyone looking for a no-bake treat. The most time-consuming part is chilling the mixture and shaping the balls, but it’s quite straightforward. The chocolate dipping is also simple, especially with the addition of shortening for a smooth finish. For other easy dessert ideas, check out berry crumble.
Can I substitute ingredients in this Martha Washington confection recipe?
You can make a few substitutions! For the nuts, walnuts or almonds can be used instead of pecans. While cherries add a classic touch, you could omit them or try finely diced candied pineapple for a different flavor profile. For the chocolate coating, milk or dark chocolate chips work just as well as semi-sweet, and you can even use white chocolate for a different look. If you’re interested in other chocolate-based desserts, consider apple pie with a chocolate crust variation.
What is the best way to store homemade Martha Washington candy?
For the best Martha Washington candy storage, keep them in an airtight container. They are best stored in the refrigerator for up to 2-3 weeks, as this helps keep the chocolate coating firm. If you need to store them for longer, you can freeze them for up to 3 months. Just ensure they are well-wrapped to prevent freezer burn.
Variations of Martha Washington Candy You Can Try
While the classic recipe is absolutely delicious, don’t be afraid to get creative! Exploring different Martha Washington candy variations can add exciting new twists to this beloved treat. Here are a few ideas to inspire your next batch.
- Dietary Adjustments: For a dairy-free version, use vegan butter and a dairy-free sweetened condensed milk alternative. You can also try plant-based chocolate chips for the coating.
- Flavorful Twists: Add a hint of orange zest to the filling for a citrusy note, or a tablespoon of finely chopped candied ginger for a spicy kick. Dark chocolate lovers might prefer a bittersweet chocolate coating.
- Nutty Alternatives: If pecans aren’t your favorite, consider using walnuts or almonds for your Martha Washington nut candy. Each nut offers a slightly different flavor profile and crunch.
- Coconut Focus: For an even more intense coconut experience, try using toasted shredded coconut in the filling. This adds a deeper, nuttier flavor to your Martha Washington coconut candy. You could even experiment with different types of shredded coconut, like macaroons style, for a chewier texture.
Martha Washington Candy: Magical Nostalgic Treat

Martha Washington Candy is a classic old-fashioned holiday treat made with a creamy coconut, cherry, and pecan filling, all coated in rich chocolate. Perfect for gifting or sharing, this no-bake recipe is nostalgic, freezer-friendly, and irresistibly sweet.
- Prep Time: 1 hour
- Cook Time: 0 minutes
- Total Time: 2 hours
- Yield: Approximately 80 candies 1x
- Category: Dessert
- Method: No-Bake
- Cuisine: American
- Diet: Vegetarian
Ingredients
- 1 cup unsalted butter, softened
- 1 tablespoon vanilla extract
- 1 (14-ounce) can sweetened condensed milk
- 4 cups powdered sugar
- 14 ounces sweetened shredded coconut
- 10-ounce jar maraschino cherries, drained and chopped
- 3 cups pecans, chopped
- 6 cups semi-sweet chocolate chips
- 4 tablespoons shortening
Instructions
- In a large mixing bowl, beat together the softened butter, vanilla extract, and sweetened condensed milk until smooth and creamy.
- Add the powdered sugar and mix until fully combined.
- Fold in the coconut, cherries, and pecans until evenly distributed.
- Cover the bowl with plastic wrap and refrigerate the mixture for 1 to 2 hours to firm up.
- Line two baking sheets with parchment paper.
- Using a 1½ tablespoon scoop or melon baller, shape the mixture into balls and place them on the baking sheets.
- Refrigerate the rolled balls until firm again.
- In a microwave-safe bowl, combine chocolate chips and shortening.
- Heat in 30-second intervals, stirring in between until melted and smooth.
- Using a fork, dip each chilled ball into the chocolate, allowing excess to drip off, then place it back on the parchment-lined tray.
- Repeat for all candies, then refrigerate to set completely before serving or storing.
Notes
- Dust hands with powdered sugar to reduce stickiness while rolling balls.
- You can halve the recipe for a smaller batch.
- Store in the fridge for 2–3 weeks or freeze for up to 3 months.
- Use shortening in chocolate to keep the coating smooth and slightly soft at room temperature.
- Dark, milk, or white chocolate can be used for coating based on preference.
Nutrition
- Serving Size: 1 candy


Leave a Reply