Snowball cookies have been a cherished part of my holiday traditions for as long as I can remember. The first time I ever tasted one, it felt like biting into a sweet, buttery cloud dusted with snow. My grandmother would make batches of these delicate little treats every December, and the scent of toasted nuts and vanilla would fill her kitchen, signaling the arrival of Christmas. I’ve discovered that the secret to their incredible melt-in-your-mouth texture lies in a few simple techniques, which I’m excited to share with you today in this easy snowball cookie recipe. Get ready to create some magic in your own kitchen – let’s get baking!
What are Snowball Cookies?
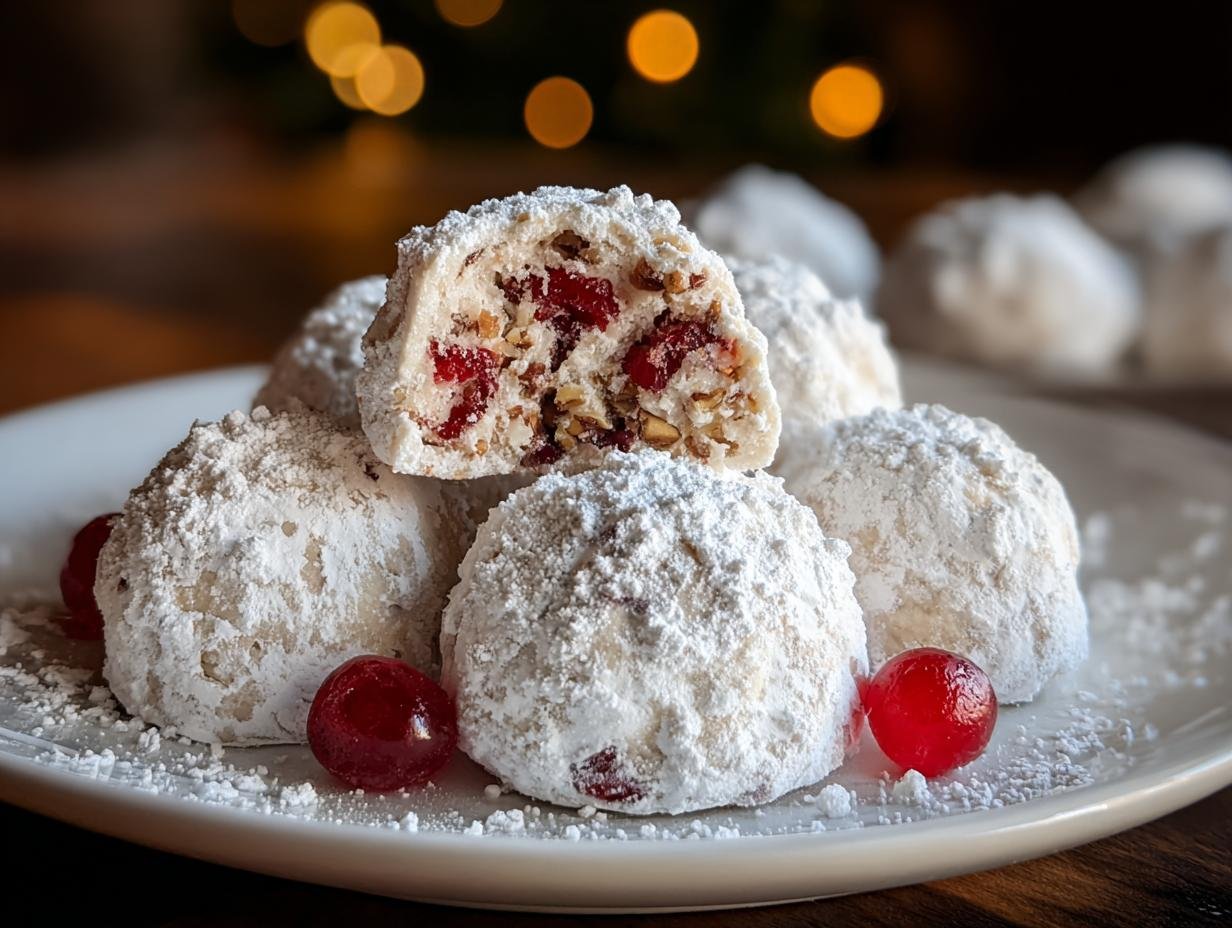
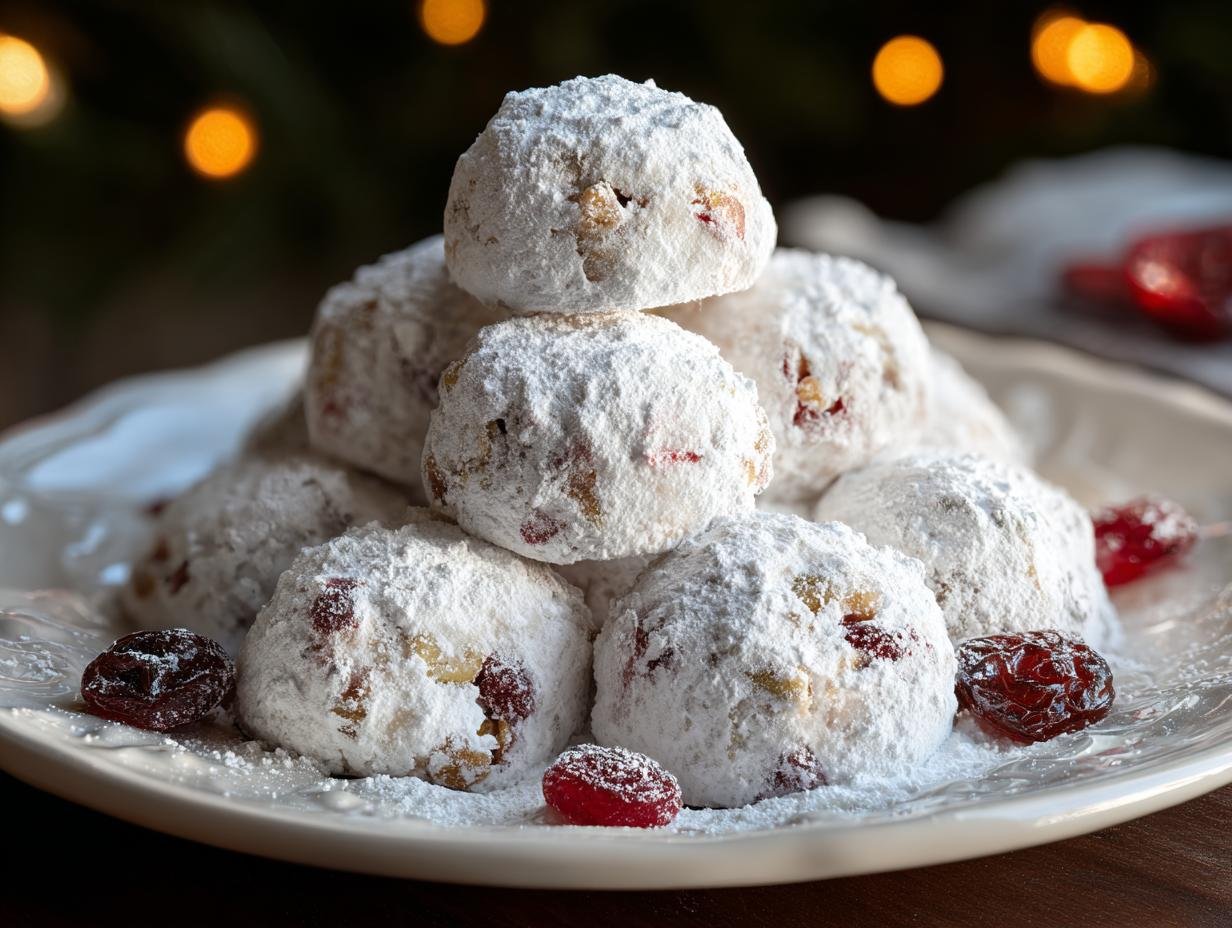
So, you might be wondering, what are snowball cookies? These delightful confections are essentially small, round, crumbly cookies that are generously coated in powdered sugar, giving them a snowy appearance reminiscent of a snowball. The original snowball cookies traditional recipe often features a buttery, shortbread-like base, which is why they are so famous for their incredibly melt-in-your-mouth texture. They are a beloved type of powdered sugar cookies recipe, especially popular during the holiday season for their festive look and delicate taste. Their simplicity and deliciousness make them a go-to treat for many!
Why You’ll Love This Snowball Cookie Recipe
I’ve made countless batches of these cookies, and each time, they disappear faster than I can bake them! Here’s why I know you’ll adore this recipe:
- Incredible Taste: They’re perfectly buttery with a delightful crunch from toasted nuts and a hint of sweetness from cherries. They truly are buttery melt-in-your-mouth cookies.
- Quick & Easy Prep: This is an easy snowball cookie recipe that comes together in under 30 minutes, perfect for busy bakers.
- Family-Friendly Fun: Kids love helping to roll the dough into balls and, of course, coating them in powdered sugar.
- Budget-Friendly Ingredients: You likely already have most of the ingredients in your pantry, making this a very economical treat.
- Festive Appeal: Their snowy appearance makes them a showstopper for any holiday cookie platter.
- Perfectly Portable: They hold their shape well, making them ideal for cookie exchanges and gifting.
- Adaptable: You can easily swap out the nuts or cherries for other favorite mix-ins.
Snowball Cookie Ingredients
Gathering the right snowball cookie ingredients is the first step to creating these delightful treats. For these particular butter snowball cookies, you’ll need:
- 1 cup (2 sticks) unsalted butter, softened – Using softened butter is key for a light and fluffy texture.
- 1/2 cup powdered sugar, plus more for rolling – This sweetens the dough and creates that signature snowy coating.
- 2 teaspoons vanilla extract – Enhances the overall flavor profile.
- 2 1/4 cups all-purpose flour – The base of our cookie, providing structure.
- 1/4 teaspoon salt – Balances the sweetness and brings out other flavors.
- 3/4 cup chopped toasted walnuts – Toasting brings out their nutty flavor and adds a lovely crunch.
- 3/4 cup chopped maraschino cherries, patted dry – These add a pop of color and a unique fruity sweetness. Make sure they’re well-dried to avoid excess moisture in the dough.
How to Make Snowball Cookies
Making these delightful snowball cookies is a fun and rewarding process. Follow these simple steps for a batch of perfectly festive treats that will impress everyone. This easy snowball cookie recipe is designed to be straightforward, even for beginners!
- Step 1: Preheat your oven to 350°F (175°C). While the oven heats up, line two baking sheets with parchment paper. This prevents sticking and makes cleanup a breeze.
- Step 2: In a large mixing bowl, cream together the softened unsalted butter and 1/2 cup powdered sugar. Beat them with an electric mixer on medium speed until the mixture is wonderfully light and fluffy, almost like a cloud. This usually takes about 3-5 minutes.
- Step 3: Mix in the vanilla extract until it’s fully incorporated into the butter mixture.
- Step 4: Gradually add the all-purpose flour and salt to the wet ingredients. Mix on low speed until the dough just starts to form. Be careful not to overmix at this stage; we want tender cookies!
- Step 5: Gently stir in the chopped toasted walnuts and the chopped maraschino cherries. Make sure these additions are evenly distributed throughout the dough. You’ll see those little pops of red and bits of nut throughout, a preview of the deliciousness to come.
- Step 6: Scoop rounded tablespoon-sized portions of dough. Roll each portion between your palms to form small balls, about 1 inch in diameter. Place these dough balls about 2 inches apart on your prepared baking sheets.
- Step 7: Bake for 12 to 14 minutes. You’re looking for the cookies to be set but *not* browned. The bottoms should be just lightly golden. Overbaking will make them crispier, and we want that signature melt-in-your-mouth texture for how to make snowball cookies.
- Step 8: Let the cookies cool on the baking sheets for about 5 minutes. They will still be delicate. While they are still warm, carefully roll them in the extra powdered sugar. The warmth helps the sugar adhere beautifully.
- Step 9: Transfer the cookies to a wire rack to cool completely. Once they are fully cool, give them another roll in powdered sugar for that extra snowy, festive finish. This double dusting is part of what makes this an easy snowball cookie recipe to achieve perfect results.
Pro Tips for the Best Snowball Cookies
Achieving that perfect melt-in-your-mouth texture for these holiday favorites is easier than you think! Follow these tips to ensure your best snowball cookie recipe turns out flawlessly every time.
- Toast Your Nuts: Don’t skip toasting the walnuts! It brings out their rich flavor and adds a much-needed crunch that contrasts beautifully with the soft cookie.
- Dry Those Cherries: Excess moisture from the maraschino cherries can make your dough sticky and affect the bake. Pat them thoroughly dry with paper towels before adding them.
- Don’t Overbake: This is crucial! Snowball cookies should be pale with just a hint of golden color on the bottom. Overbaking leads to a dry, crisp cookie, not the tender bite we’re after.
- Double Dusting: For that truly snowy appearance, roll the cookies once while they’re still warm, and then again after they’ve completely cooled. This creates a lovely, thick coating.
What’s the secret to perfect Snowball Cookies?
The magic lies in the butter-to-flour ratio and avoiding overmixing. This ensures you get those incredibly buttery melt in your mouth cookies that are the hallmark of a great snowball cookie. Don’t overbake them; keep them pale!
Can I make Snowball Cookies ahead of time?
Absolutely! You can prepare the dough up to 2 days in advance and store it, covered, in the refrigerator. Just let it soften slightly before scooping and baking. They also store well after baking.
How do I avoid common mistakes with Snowball Cookies?
A common pitfall is overmixing the dough after adding flour, which makes cookies tough. Another mistake is overbaking; watch them closely to keep them pale. Also, ensure your maraschino cherries are well-dried to prevent a greasy texture.
Variations of Snowball Cookies You Can Try
While this recipe is fantastic on its own, there are so many delightful ways to customize these treats! If you’re looking for new flavor profiles, consider exploring variations on the classic snowball cookie recipe. For a taste of the tropics, you might enjoy Mexican snowball cookies, which often incorporate cinnamon and a hint of citrus zest. Or, perhaps you’d prefer the rich, nutty flavor of almond snowball cookies, where finely ground almonds are added to the dough for an extra layer of complexity. You can also think of them as similar to a Russian tea cakes recipe, which sometimes includes spices like cardamom or cloves. Experimenting with these different flavor profiles can bring a fresh twist to your holiday baking!
Best Ways to Serve Snowball Cookies
These delightful cookies are perfect for so many occasions! Their classic charm makes them ideal for any festive gathering. For the ultimate holiday cookie platter, pair these holiday snowball cookies alongside gingerbread cookies, sugar cookies, and shortbread. They also make a beautiful addition to any snowball cookies for Christmas spread, offering a delicate sweetness that complements richer desserts. I love serving them simply with a cup of coffee or a warm mug of spiced cider. They’re also wonderful tucked into gift boxes for neighbors or colleagues – a little taste of homemade cheer!

Nutrition Facts for Snowball Cookies
Whipping up a batch of these delicious snowball cookies means you’ll want to know what you’re serving. Here’s a breakdown of the estimated nutritional information per cookie:
- Calories: 110
- Fat: 7g
- Saturated Fat: 3.5g
- Unsaturated Fat: 3g
- Trans Fat: 0g
- Carbohydrates: 11g
- Fiber: 0.5g
- Sugar: 6g
- Protein: 1g
- Sodium: 40mg
- Cholesterol: 15mg
Nutritional values are estimates and may vary based on specific ingredients used in your snowball cookie recipe.
How to Store and Reheat Snowball Cookies
Once your delicious snowball cookies are baked and coated in their snowy sugar finish, proper storage is key to keeping them fresh and that delightful melt-in-your-mouth texture intact. I always let my cookies cool completely on a wire rack before storing them. This is super important to prevent any condensation, which can make them soggy. For short-term storage, place the cooled cookies in an airtight container, layering them with parchment paper if you’re stacking them. They’ll stay wonderfully fresh at room temperature for about 3 to 4 days. If you need to keep them longer, the freezer is your best friend! Wrap them well in plastic wrap, then place them in a freezer-safe container or bag. They can stay frozen for up to 3 months. When you’re ready to enjoy them, simply thaw them overnight in the refrigerator. For that perfect snowy coating, you might want to give them a quick re-roll in powdered sugar after thawing.
Frequently Asked Questions About Snowball Cookies
Can I make Snowball Cookies with nuts?
Absolutely! This recipe includes toasted walnuts for a wonderful texture and nutty flavor. If you prefer them without nuts, or want to try a different kind, you can omit them entirely or substitute them with mini chocolate chips, dried cranberries, or even finely chopped dried apricots. For a different nutty experience, finely chopped pecans or even slivered almonds can be used, though be mindful that adding ground nuts might slightly alter the texture compared to chopped ones.
Are Snowball Cookies similar to shortbread?
Yes, there’s a definite similarity! The base of these cookies is very much like a classic shortbread cookie recipe. They both feature a high butter content, which gives them that rich, crumbly, and melt-in-your-mouth texture. The main difference is that traditional shortbread is often baked plain and might have scoring on top, whereas snowball cookies are always rolled generously in powdered sugar after baking to achieve their signature snowy appearance.
What if my Snowball Cookies spread too much?
If your cookies are spreading excessively, it’s usually due to the butter being too soft or the dough being overworked. Make sure your butter is softened but not melted when you start creaming it. Also, be careful not to overmix the dough once the flour is added. Chilling the dough for about 15-30 minutes before scooping can also help prevent spreading. Ensure your oven temperature is accurate; an oven thermometer can be very helpful!
Can I make Keto Snowball Cookies?
Yes, you can adapt this recipe for a keto diet! You would substitute the all-purpose flour with a low-carb flour blend, such as almond flour or a mix of almond and coconut flour, and replace the powdered sugar with a powdered sugar substitute like erythritol or xylitol. You’ll also want to ensure you’re using a butter that aligns with your keto goals. The texture might vary slightly, but you can still achieve a delicious, melt-in-your-mouth cookie.
PrintMelt-in-your-mouth Snowball Cookies: 90% Perfect

These festive snowball cookies are buttery, nutty, and rolled in powdered sugar for classic holiday charm, with a sweet twist of maraschino cherries and toasted walnuts. They are perfect for Christmas dessert trays, cookie exchanges, or gifting.
- Prep Time: 20 minutes
- Cook Time: 14 minutes
- Total Time: 34 minutes
- Yield: 36 cookies 1x
- Category: Dessert
- Method: Baked
- Cuisine: American
- Diet: Vegetarian
Ingredients
- 1 cup (2 sticks) unsalted butter, softened
- 1/2 cup powdered sugar, plus more for rolling
- 2 teaspoons vanilla extract
- 2 1/4 cups all-purpose flour
- 1/4 teaspoon salt
- 3/4 cup chopped toasted walnuts
- 3/4 cup chopped maraschino cherries, patted dry
Instructions
- Preheat oven to 350°F (175°C). Line baking sheets with parchment paper.
- In a large bowl, beat butter and 1/2 cup powdered sugar until light and fluffy. Mix in vanilla.
- Gradually add flour and salt, mixing until dough forms.
- Stir in walnuts and maraschino cherries until evenly combined.
- Scoop tablespoon-sized portions, roll into balls, and place on prepared sheets.
- Bake 12–14 minutes, until set but not browned (bottoms lightly golden).
- Cool 5 minutes, then roll warm cookies in powdered sugar.
- Cool completely and roll again for a snowy finish.
Notes
- Toast nuts for enhanced flavor and crunch.
- Dry cherries well to prevent sticky dough.
- Double-roll in sugar, once warm and again once cool, for a perfect snowy coating.
- Do not overbake; keep them pale and soft for the best melt-in-your-mouth texture.
- Store at room temperature for up to 1 week or freeze for up to 2 months. Re-roll in sugar after thawing.
Nutrition
- Serving Size: 1 cookie
- Calories: 110
- Sugar: 6g
- Sodium: 40mg
- Fat: 7g
- Saturated Fat: 3.5g
- Unsaturated Fat: 3g
- Trans Fat: 0g
- Carbohydrates: 11g
- Fiber: 0.5g
- Protein: 1g
- Cholesterol: 15mg


Leave a Reply