
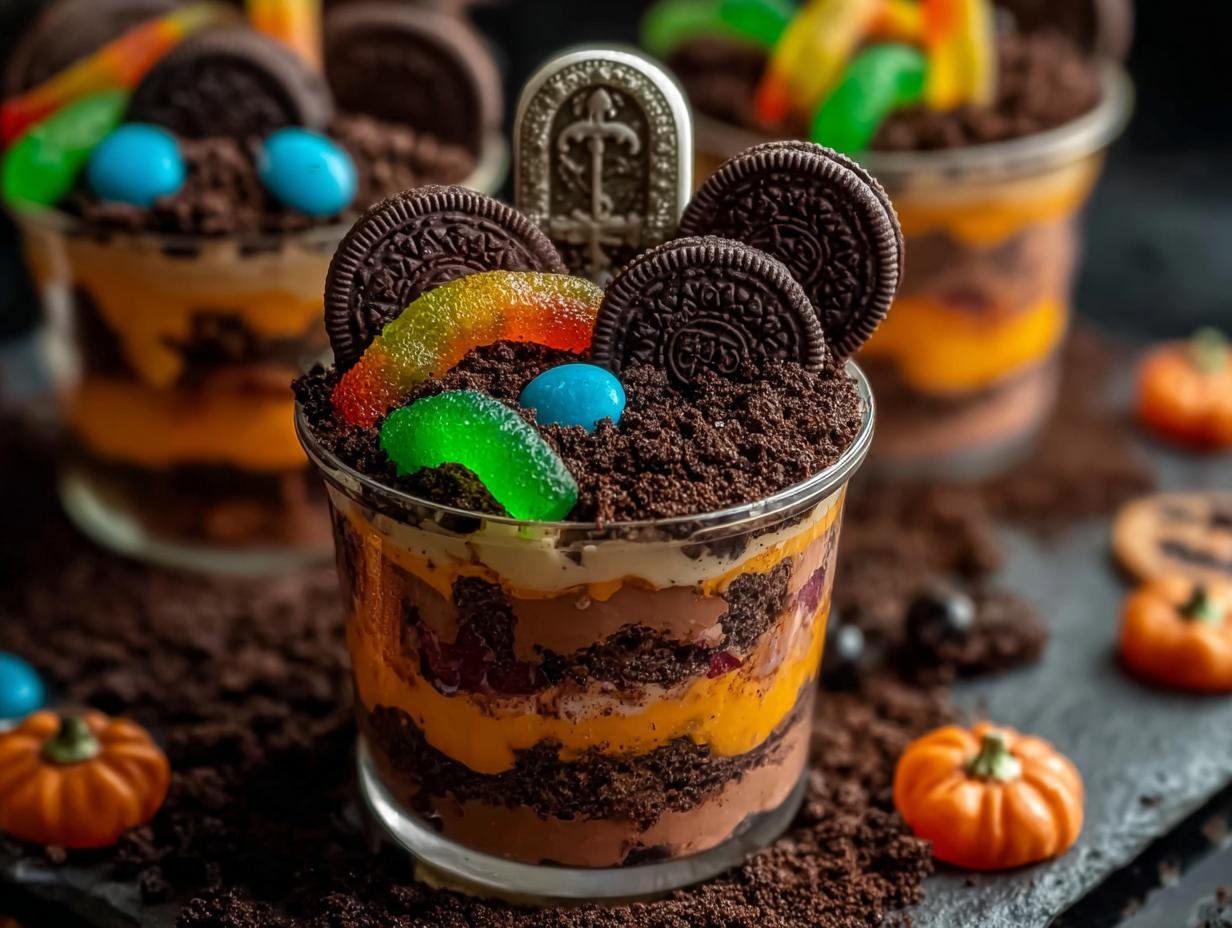
Halloween Graveyard Dirt Cups have been my go-to spooky treat for years, ever since I first saw them at a neighborhood Halloween party. The idea of edible dirt and candy tombstones just blew my mind as a kid, and now I love creating them for my own family. The rich chocolate pudding mixed with fluffy whipped cream creates a texture that’s almost like a light mousse, and the crushed Oreos truly taste like dark, delicious soil. These are such easy Halloween dirt cups to assemble, making them perfect for busy parents and fun for kids to help with. Get ready for some spooky fun in the kitchen – let’s make some graveyard magic!
Why You’ll Love These Halloween Graveyard Dirt Cups
- They’re incredibly simple to make, perfect for last-minute party prep.
- The combination of creamy chocolate pudding and crunchy cookie crumbs is irresistible.
- These are wonderfully kid-friendly Halloween graveyard cups, allowing little hands to help with assembly and decoration.
- The spooky graveyard theme is a huge hit at any Halloween party or gathering.
- You can customize the decorations with various candies to make each cup unique.
- They offer a delightful contrast in textures, making every bite exciting.
- These kid-friendly Halloween graveyard cups are a guaranteed crowd-pleaser for all ages.
- They provide a fun and tasty way to embrace the Halloween spirit.
Ingredients for Halloween Graveyard Dirt Cups
To bring this fun dirt cup recipe graveyard theme to life, you’ll need a few simple things. The chocolate pudding mix and milk form the base of our spooky soil, while a touch of heavy cream and vanilla extract makes it wonderfully light and flavorful. Don’t skip the optional peppermint extract if you love a hint of mint with your chocolate! The crushed Oreo cookies are essential for that perfect dirt-like texture, and Milano cookies or graham crackers will be our tombstones. Finally, grab your favorite Halloween candies like candy pumpkins, candy corn, or gummy worms to really bring your Halloween graveyard dessert cups to life.
- 1 (3.9 ounce) package instant chocolate pudding mix – the foundation of our spooky soil
- 3 cups milk – for mixing the pudding
- 1 cup heavy cream – whips up to make the pudding extra light and mousse-like
- 1 teaspoon vanilla extract – adds a classic touch of sweetness
- 1/4 teaspoon peppermint extract (optional) – for a cool, minty surprise
- 20 Oreo cookies, crushed – our delicious, dark graveyard dirt
- 10 Milano cookies or graham crackers, for tombstones – ready for spooky inscriptions
- Candy pumpkins, candy corn, gummy worms, or other Halloween candies – for decorating your graveyard scene
- Pudding cups or small serving cups – the perfect vessels for these treats
How to Make Halloween Graveyard Dirt Cups
Now for the fun part – bringing our spooky graveyard to life! These steps will guide you through creating delightful Halloween graveyard dessert cups that are as fun to assemble as they are to eat. I love how quickly this recipe comes together, making it a fantastic option for busy evenings or last-minute party prep. Get ready to layer, decorate, and dig into these delicious treats!
Step 1: Prepare the Pudding Base
First, we need to get our chocolate pudding ready. In a medium bowl, whisk together the instant chocolate pudding mix with 3 cups of milk. Whisk for about 2 minutes until it starts to thicken. Let this mixture sit in the refrigerator for about 5 minutes to set up slightly for our Halloween graveyard dirt cups.
Step 2: Create the Whipped Cream Mousse
While the pudding is chilling, let’s whip the cream. In a separate, chilled bowl, beat the heavy cream with the vanilla extract and optional peppermint extract on medium-high speed until stiff peaks form. This creates a light, airy mousse that makes these spooky graveyard pudding cups extra decadent and delicious.
Step 3: Assemble the Graveyard Layers
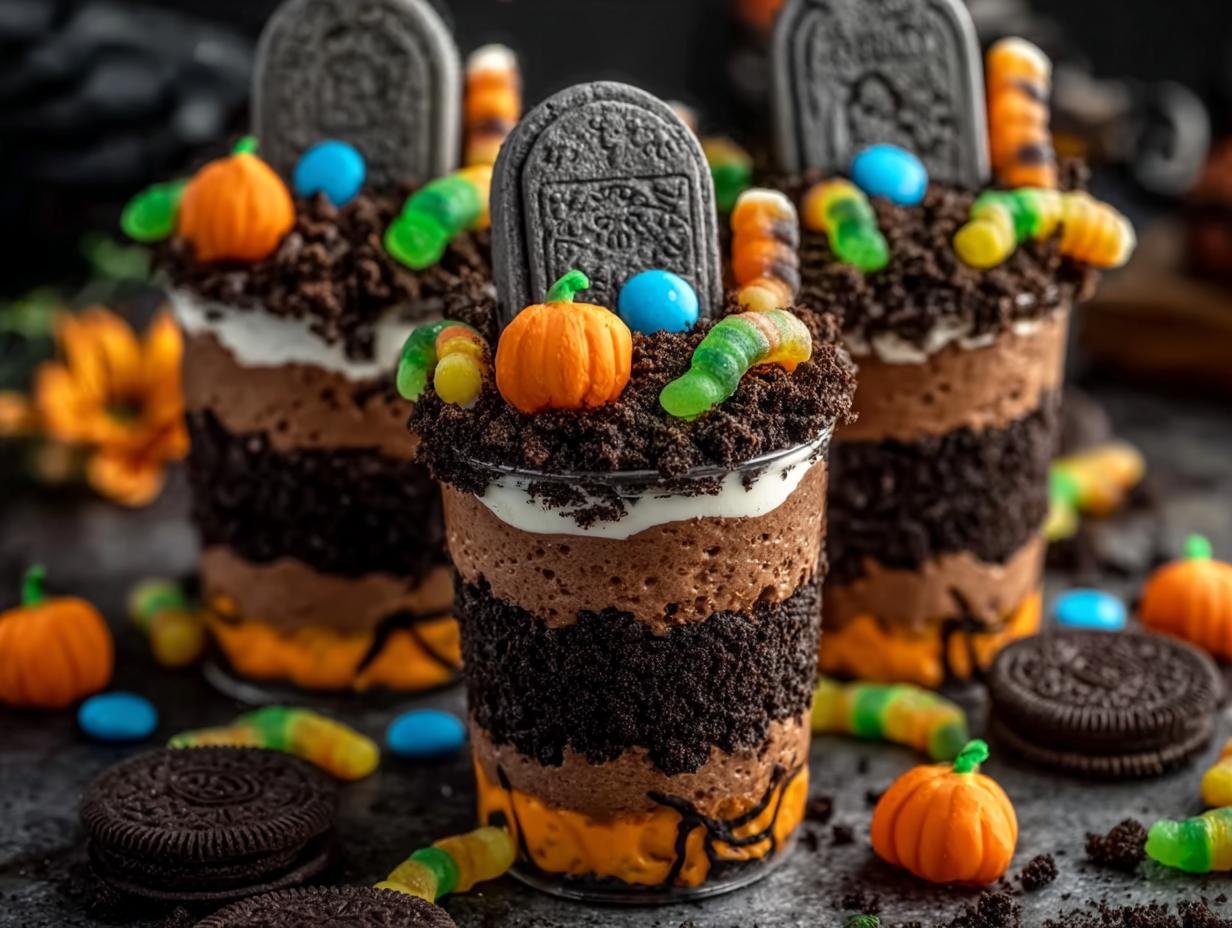
Time to build our edible graveyard! Gently fold the whipped cream into the set chocolate pudding until just combined. You want to keep it airy. Spoon a layer of this luscious chocolate mixture into the bottom of your serving cups. Then, add a generous layer of your crushed Oreo “dirt.” Repeat these layers until the cups are filled, finishing with a layer of cookie crumbs on top.
Step 4: Decorate Your Edible Graveyard Dirt Cups
This is where the magic happens! To create Halloween dirt cups with candy tombstones, gently insert a Milano cookie or graham cracker into the top layer of crumbs in each cup. Now, let your creativity run wild! Add candy pumpkins, candy corn, gummy worms, or any other spooky candies you like to build a creepy cemetery scene on top of your delicious dirt cups.
Pro Tips for the Best Halloween Graveyard Dirt Cups
Want to elevate your Halloween graveyard dessert cups from good to spooktacular? I’ve picked up a few tricks over the years that really make these treats shine. These simple tips will ensure your graveyard is the star of any Halloween party, making them the perfect kid-friendly Halloween graveyard cups.
- For an extra rich flavor, use chocolate milk instead of regular milk when preparing the pudding mix.
- Make sure to chill the assembled dirt cups for at least 30 minutes before serving. This gives the flavors time to meld and the texture to firm up beautifully.
- Get creative with your tombstones! Use edible markers to write names or spooky messages on the Milano cookies or graham crackers for an extra personal touch.
- Consider adding a layer of mini chocolate chips or candy-coated chocolate pieces beneath the cookie crumbs for an added burst of texture and flavor.
What’s the secret to perfect spooky graveyard pudding cups?
The real secret to amazing spooky graveyard pudding cups is the combination of light, airy whipped cream folded into the chocolate pudding. This creates a mousse-like texture that’s far more delightful than just plain pudding, making each spoonful heavenly.
Can I make Halloween graveyard dirt cups ahead of time?
Absolutely! You can assemble these Halloween graveyard dirt cups up to 24 hours in advance. Just cover them tightly with plastic wrap and store them in the refrigerator. Add the tombstones and final decorations just before serving to keep them looking their best.
How do I avoid common mistakes with DIY graveyard dirt cups recipe?
A common pitfall with this DIY graveyard dirt cups recipe is overmixing the whipped cream into the pudding, which can deflate it. Fold gently! Also, ensure your cookie crumbs are fine enough to resemble dirt, not chunky pieces. Finally, don’t let the pudding get too firm before assembling, or it will be hard to layer.
Best Ways to Serve Halloween Graveyard Dirt Cups
These Halloween graveyard dirt cups are fantastic on their own, but they also pair wonderfully with other Halloween treats. Serve them at your next spooky gathering for an enchanting dessert experience. They’re perfect alongside a bubbling cauldron of witch’s brew punch or a plate of monster eye cookies. For a more substantial pairing, consider serving them after a kid-friendly Halloween dinner like “spiderweb” pizza or “mummy” hot dogs. This delightful Halloween cemetery dirt pudding is sure to be the sweet highlight of any party, making your dessert table truly unforgettable.
Nutrition Facts for Halloween Graveyard Dirt Cups
Creating these fun Halloween graveyard dessert cups is a treat in itself, and knowing the nutritional details can help you enjoy them even more. Here’s a breakdown per serving of these delightful Halloween cemetery dirt pudding treats. Remember, these are delicious estimates!
- Serving Size: 1 cup
- Calories: 350
- Fat: 18g
- Saturated Fat: 10g
- Unsaturated Fat: 8g
- Trans Fat: 0g
- Carbohydrates: 45g
- Fiber: 2g
- Sugar: 30g
- Protein: 5g
- Sodium: 200mg
- Cholesterol: 30mg
Nutritional values are estimates and may vary based on specific ingredients used.
How to Store and Reheat Halloween Graveyard Dirt Cups
Wondering how to keep these spooky treats fresh? Storing your Halloween graveyard dirt cups is super simple. Once they’ve cooled completely, transfer them to airtight containers. You can keep them in the refrigerator for up to 3-4 days. For longer storage, these simple graveyard dirt cups Halloween also freeze beautifully! Wrap each cup tightly in plastic wrap, then add a layer of aluminum foil. They’ll stay good in the freezer for about 3 months.
When you’re ready to serve frozen graveyard dirt cups, the best method is to thaw them overnight in the refrigerator. This allows them to gently come back to temperature without affecting the texture of the pudding or cookie crumbs. If they seem a little too firm after thawing, you can let them sit at room temperature for about 15-20 minutes. Reheating isn’t typically necessary for these chilled desserts, but if you prefer them slightly softer, a very brief microwave zap (just 5-10 seconds) can do the trick, though be careful not to melt the decorations!
Frequently Asked Questions About Halloween Graveyard Dirt Cups
What are Halloween graveyard dirt cups?
Halloween graveyard dirt cups are a fun, no-bake dessert that mimics a spooky graveyard scene. They typically consist of layers of chocolate pudding and crushed chocolate cookies (to look like dirt), topped with cookie “tombstones” and other Halloween candies like gummy worms or candy pumpkins. They’re a creative and edible way to celebrate the eerie season.
Why make graveyard dirt cups for Halloween?
You should make graveyard dirt cups for Halloween because they are incredibly fun, visually appealing, and delicious! They’re a fantastic way to get kids involved in the kitchen, offering a creative outlet for their imaginations. Plus, they’re surprisingly easy to make, making them perfect for parties, school treats, or just a festive family activity. They truly capture the spirit of Halloween in a tasty treat.
Can I make the cookie “dirt” ahead of time?
Yes, you absolutely can! To save time, crush your Oreo cookies for the “dirt” up to a day in advance. Store the cookie crumbs in an airtight container at room temperature. This makes assembly much quicker when you’re ready to build your Halloween cemetery dirt pudding creations.
What other candies can I use for graveyard decorations?
The possibilities are endless! Beyond candy pumpkins and gummy worms, consider using candy bones, chocolate rocks, chocolate spiders, or even little meringue ghosts for your Halloween dirt cups with candy tombstones. You can also use frosting to draw spiderwebs on the tombstones or around the cups for an extra spooky touch.
Variations of Halloween Graveyard Dirt Cups You Can Try
Looking to switch things up or cater to different dietary needs? These Halloween graveyard dessert cups are wonderfully versatile! You can easily adapt them to fit your preferences or your guests’ needs. Let’s explore some fun ways to make your graveyard treats even more unique.
- Dietary Adaptations: For gluten-free friends, swap the Oreo cookies for a gluten-free chocolate cookie alternative. You can also use dairy-free milk and whipped topping to create vegan ghostly graveyard dirt cups. Just ensure your pudding mix is also dairy-free.
- Flavor Twists: Amp up the chocolate by using chocolate milk for the pudding base. For a richer taste, add a tablespoon of instant espresso powder to the dry pudding mix. You could also experiment with different flavored pudding mixes, like cheesecake or white chocolate, for a unique twist.
- Spooky Visuals: Create stunning spiderweb graveyard dirt cups by piping white icing onto the chocolate cookie crumbs in a spiderweb pattern before adding the tombstone. You can also use green-tinted pudding or whipped cream for a more eerie swamp-like effect.
- Texture Boost: Add a layer of mini chocolate chips or chocolate-covered candies beneath the cookie crumbs for an extra surprise when digging into your Halloween cemetery dirt pudding.
Halloween Graveyard Dirt Cups: Spooky & Easy Treat

Create an enchanting Halloween graveyard dirt cup dessert. This recipe is a fun and spooky treat perfect for Halloween parties. You’ll love making these edible graveyard dirt cups.
- Prep Time: 20 minutes
- Cook Time: 5 minutes
- Total Time: 25 minutes
- Yield: 10 servings 1x
- Category: Desserts
- Method: No-Bake
- Cuisine: American
- Diet: Vegetarian
Ingredients
- 1 (3.9 ounce) package instant chocolate pudding mix
- 3 cups milk
- 1 cup heavy cream
- 1 teaspoon vanilla extract
- 1/4 teaspoon peppermint extract (optional)
- 20 Oreo cookies, crushed
- 10 Milano cookies or graham crackers, for tombstones
- Candy pumpkins, candy corn, gummy worms, or other Halloween candies
- Pudding cups or small serving cups
Instructions
- Prepare the chocolate pudding according to package directions, using 3 cups of milk. Let it set in the refrigerator for about 5 minutes.
- While the pudding sets, whip the heavy cream with vanilla extract and peppermint extract (if using) until stiff peaks form.
- Gently fold the whipped cream into the prepared chocolate pudding until just combined. This creates a lighter, mousse-like texture for your spooky graveyard dirt cups.
- Crush the Oreo cookies into fine crumbs to resemble dirt.
- Assemble your Halloween graveyard dirt cups. Spoon a layer of the chocolate pudding mixture into the bottom of each pudding cup.
- Add a layer of crushed Oreo cookie crumbs over the pudding.
- Repeat layers until the cups are filled, ending with a layer of cookie crumbs on top.
- Decorate your edible graveyard dirt cups. Insert a Milano cookie or graham cracker into each cup to serve as a tombstone.
- Add candy pumpkins, candy corn, gummy worms, or other Halloween candies to create a spooky graveyard scene on top of your dirt cup recipe graveyard theme.
Notes
- For a richer flavor, use chocolate milk instead of regular milk for the pudding.
- Chill the dirt cups for at least 30 minutes before serving to allow flavors to meld.
- Get creative with your tombstone decorations; you can write names on them with edible marker.
- Consider adding a layer of chocolate chips or mini chocolate candies for extra texture.
Nutrition
- Serving Size: 1 cup
- Calories: 350
- Sugar: 30g
- Sodium: 200mg
- Fat: 18g
- Saturated Fat: 10g
- Unsaturated Fat: 8g
- Trans Fat: 0g
- Carbohydrates: 45g
- Fiber: 2g
- Protein: 5g
- Cholesterol: 30mg


Leave a Reply