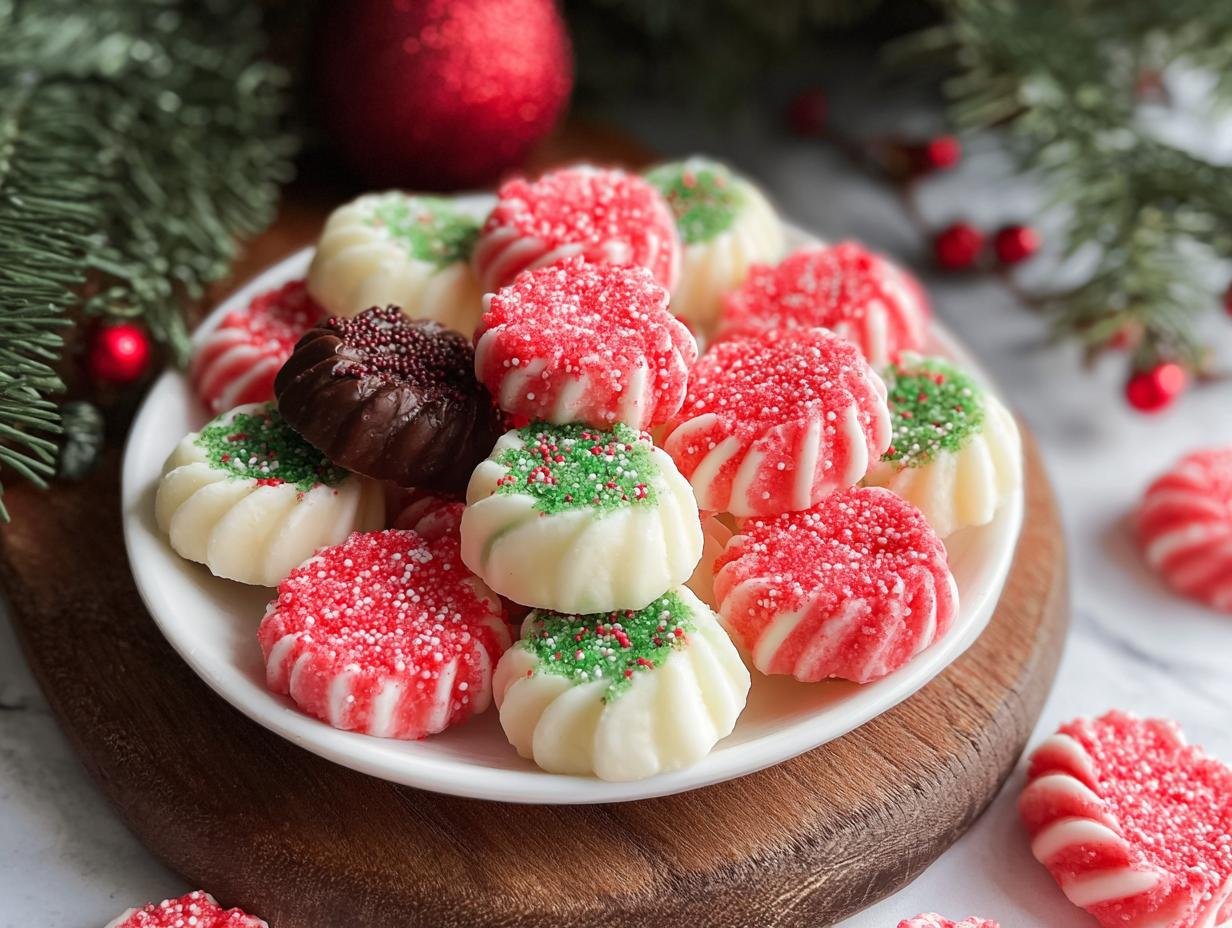
Christmas Mints Dessert has always been my go-to for bringing that extra sparkle to the holidays. I remember my aunt making these melt-in-your-mouth candies every year, filling her kitchen with the sweet scent of peppermint and the sight of vibrant red and green. They’re not just a treat; they’re a little piece of Christmas magic! If you’re looking for a truly delightful Christmas mint dessert recipe that’s incredibly easy to whip up, you’ve found it. This homemade Christmas mint dessert is perfect for gifting or simply adorning your holiday dessert table. Let’s get cooking!
Why You’ll Love This Christmas Mints Dessert
You’ll adore this delightful candy for so many reasons this holiday season:
- The flavor is pure peppermint perfection, a classic taste that screams Christmas.
- It’s an incredibly easy Christmas mint dessert that requires no baking at all.
- Prep time is minimal, making it a perfect activity for busy holiday schedules.
- While not a health food, the portion control of small mints can be a mindful treat.
- This recipe is wonderfully budget-friendly, using simple pantry staples.
- It’s a fantastic family-friendly activity – kids love helping with the coloring and shaping!
- This easy Christmas mint dessert is a guaranteed crowd-pleaser for parties and gatherings.
- The melt-in-your-mouth texture is simply divine and so satisfying.
Ingredients for Christmas Mints Dessert
Gather these simple ingredients for a truly festive treat that tastes like a dream:
- 8 oz cream cheese, softened – this is the magic binder that makes them melt-in-your-mouth
- 2 tablespoons butter, softened – adds richness and helps with smooth texture
- 6 cups powdered sugar, approx. – the base for our sweet, pliable candy
- 1 teaspoon peppermint extract – the star flavor that makes it a perfect Christmas candy cane dessert
- Red and green gel food coloring – for that classic festive look! Gel is best as it won’t make the dough sticky.
- Sprinkles (optional, for decoration) – add a little sparkle for extra holiday cheer
How to Make Christmas Mints Dessert
Get ready to create the most delightful holiday candy that truly captures the spirit of the season. These mints are surprisingly simple to make and will fill your home with the sweet aroma of peppermint.
- Step 1: Begin by beating the softened 8 oz cream cheese and 2 tablespoons butter in a large mixing bowl. Use an electric mixer on medium speed until the mixture is completely smooth and creamy. This forms the rich base for our delightful candy.
- Step 2: Gradually add the 6 cups powdered sugar, about one cup at a time, mixing well after each addition. Continue until the mixture starts to resemble a stiff dough. You want it to be pliable enough to shape, but not sticky.
- Step 3: Stir in the 1 teaspoon peppermint extract. Mix thoroughly until the peppermint flavor is evenly distributed throughout the dough. This is where that signature minty scent really starts to come alive, making it a wonderful precursor to a full Christmas chocolate mint dessert experience.
- Step 4: Divide the dough into portions. For vibrant holiday colors, knead a few drops of red and green gel food coloring into separate portions until you achieve your desired festive shades. Gel coloring is key here; it adds color without making the dough too wet, which is essential for a good Christmas mint dessert recipe.
- Step 5: Now for the fun part! Roll the colored dough into small balls, about 1/2 to 3/4 inch in diameter. Alternatively, you can press the dough into silicone molds or use small cookie cutters to create fun shapes. This is where you can get creative with your Christmas mint dessert!

- Step 6: Place your shaped mints on a baking sheet lined with parchment paper. Let them air dry at room temperature for approximately 24 hours. This drying time is crucial for achieving that perfect melt-in-your-mouth texture, transforming them into a true Christmas chocolate mint dessert sensation.
- Step 7: Once dried, store your beautiful homemade mints in an airtight container. They’ll keep well at room temperature for a couple of weeks, or you can freeze them for longer storage, ready for any spontaneous holiday craving or last-minute gifting.
Pro Tips for the Best Christmas Mints Dessert
Elevate your holiday candy game with these insider tips for perfect results every time:
- Always use good quality gel food coloring for vibrant hues without altering the dough consistency.
- Don’t rush the drying process; 24 hours at room temperature is essential for that signature melt-in-your-mouth texture.
- If your dough is too sticky, add a bit more powdered sugar, a tablespoon at a time. If it’s too crumbly, a teaspoon of milk or cream cheese can help.
- For an extra touch, roll the finished mints in sanding sugar or edible glitter before they fully harden.
What’s the secret to perfect Christmas Mints Dessert?
The secret lies in the creamy base of softened cream cheese and butter, combined with just the right amount of peppermint extract. Proper drying time is also crucial for achieving that ideal, delicate melt-in-your-mouth consistency that makes these such popular festive mint dessert recipes. For more baking tips, check out these dessert recipes.
Can I make Christmas Mints Dessert ahead of time?
Absolutely! These mints are fantastic for making ahead. Once completely dried, store them in an airtight container at room temperature for up to two weeks, or freeze them for up to two months. They are a perfect make-ahead addition to your holiday preparations. You might also enjoy our Cinnamon Orange Jam Linzer Cookies for more holiday baking.
How do I avoid common mistakes with Christmas Mints Dessert?
A common pitfall is using liquid food coloring, which can make the dough too sticky. Always opt for gel coloring. Also, be patient with the drying time; skipping this step will result in a soft, gooey mint rather than a firm, melt-in-your-mouth candy. This is similar to how important proper resting is for homemade bread.
Best Ways to Serve Christmas Mints Dessert
These delightful little candies are versatile and add a festive touch to any holiday spread. I love serving them alongside a rich hot chocolate or a warm mug of spiced apple cider, letting the cool peppermint complement the warm spices. They also pair beautifully with a robust coffee after a holiday meal. For a truly stunning presentation, arrange them on a tiered dessert stand with cookies and other candies, making sure your peppermint Christmas dessert offerings are visually appealing and deliciously varied! Consider adding a Pistachio Pavlova to your spread.
Nutrition Facts for Christmas Mints Dessert
Here’s a look at the estimated nutritional breakdown per mint, helping you understand this sweet treat:
- Calories: 85
- Fat: 5g
- Protein: 1g
- Carbohydrates: 10g
- Sugar: 9g
- Sodium: 15mg
Nutritional values are estimates and may vary based on specific ingredients used and portion sizes. For more healthy options, explore our Mediterranean Chickpea Salad.
How to Store and Reheat Christmas Mints Dessert
Properly storing your beautiful Christmas Mints Dessert ensures they stay fresh and delicious for your celebrations. Once your homemade mints have completely air-dried for 24 hours, allow them to cool fully to room temperature. Then, carefully place them in an airtight container. For the best quality, store them at room temperature for up to two weeks. If you need to keep this delightful homemade Christmas mint dessert for a longer period, you can freeze them for up to two months. Simply place them flat in a freezer-safe container or bag, ensuring they are well-sealed to prevent freezer burn before freezing.
Frequently Asked Questions About Christmas Mints Dessert
What’s the secret to perfect Christmas Mints Dessert?
The secret to a perfect Christmas Mints Dessert lies in using softened cream cheese and butter for a smooth base, and importantly, gel food coloring to maintain the dough’s texture. Patience during the 24-hour drying period is also key for that signature melt-in-your-mouth quality that makes these so special.
Can I make Christmas Mints Dessert ahead of time?
Absolutely! These mints are ideal for making ahead. Once they’re completely dried, you can store them in an airtight container at room temperature for up to two weeks, or freeze them for up to two months. This makes them a fantastic addition to your holiday prep, ensuring you have a delicious homemade Christmas mint dessert ready whenever you need it.
How do I avoid common mistakes with Christmas Mints Dessert?
A common pitfall is using liquid food coloring, which can make the dough too sticky and difficult to work with. Always opt for gel coloring instead. Another mistake is rushing the drying time; if you don’t let them air dry for the full 24 hours, they won’t achieve that perfect, delicate texture. Think of it like making a delicate Christmas mint cookie dessert – timing and patience are crucial! You can find more tips on achieving perfect textures in our guide to food presentation.
Can I make Christmas Mints Dessert in different flavors?
Yes, you can easily customize the flavor! While peppermint is classic for a Christmas Mints Dessert, try adding a few drops of vanilla, almond, or even a hint of orange extract to the dough. You could even experiment with a tiny bit of mint extract for a more intense flavor, or combine it with a chocolate drizzle for a decadent Christmas chocolate mint dessert variation.
Variations of Christmas Mints Dessert You Can Try
While the classic peppermint is divine, don’t be afraid to get creative with this versatile recipe! You can easily adapt these delightful mints to suit different tastes and occasions. For a decadent twist, consider a Christmas fudge recipe inspiration by adding a tablespoon of cocoa powder to a portion of the dough before coloring. Another fun idea is to incorporate a touch of citrus; a little orange zest or extract can add a bright, festive flavor that pairs wonderfully with the mint. You could even try a dairy-free version by substituting the cream cheese and butter with vegan alternatives, making it a delicious option for everyone. For a different texture, try pressing the dough into small molds or even rolling it into logs and slicing, much like a traditional Christmas mint cookie dessert.

Christmas Mints Dessert: 7 Easy Steps

Create festive and delicious Christmas Mints, a no-bake, melt-in-your-mouth holiday candy perfect for decorating dessert tables or as edible gifts. These easy-to-make treats are a delightful addition to your Christmas celebrations.
- Prep Time: 20 minutes
- Cook Time: 0 minutes
- Total Time: 24 hours
- Yield: About 100 small mints 1x
- Category: Dessert, Candy
- Method: No-Bake
- Cuisine: American
- Diet: Vegetarian
Ingredients
- 8 oz cream cheese, softened
- 2 tablespoons butter, softened
- 6 cups powdered sugar, approx.
- 1 teaspoon peppermint extract
- Red and green gel food coloring
- Sprinkles (optional, for decoration)
Instructions
- In a large mixing bowl, beat the softened cream cheese and butter until smooth and creamy.
- Gradually add powdered sugar, one cup at a time, until a dough-like consistency forms.
- Stir in peppermint extract and mix until well combined.
- Divide the dough into portions and knead in desired gel food coloring.
- Roll into small balls or press into silicone molds or shape with cookie cutters.
- Place shaped mints on a parchment-lined baking sheet and allow to air dry for 24 hours.
- Store in an airtight container at room temperature or freeze for longer storage.
Notes
- Use gel food coloring to prevent sticky dough.
- If the dough is sticky, add more powdered sugar; if crumbly, add a bit of milk or cream cheese.
- Mints can be stored for 2 weeks or frozen for up to 2 months.
- Customize with different extracts like vanilla or almond for variety.
Nutrition
- Serving Size: 1 mint


Leave a Reply