
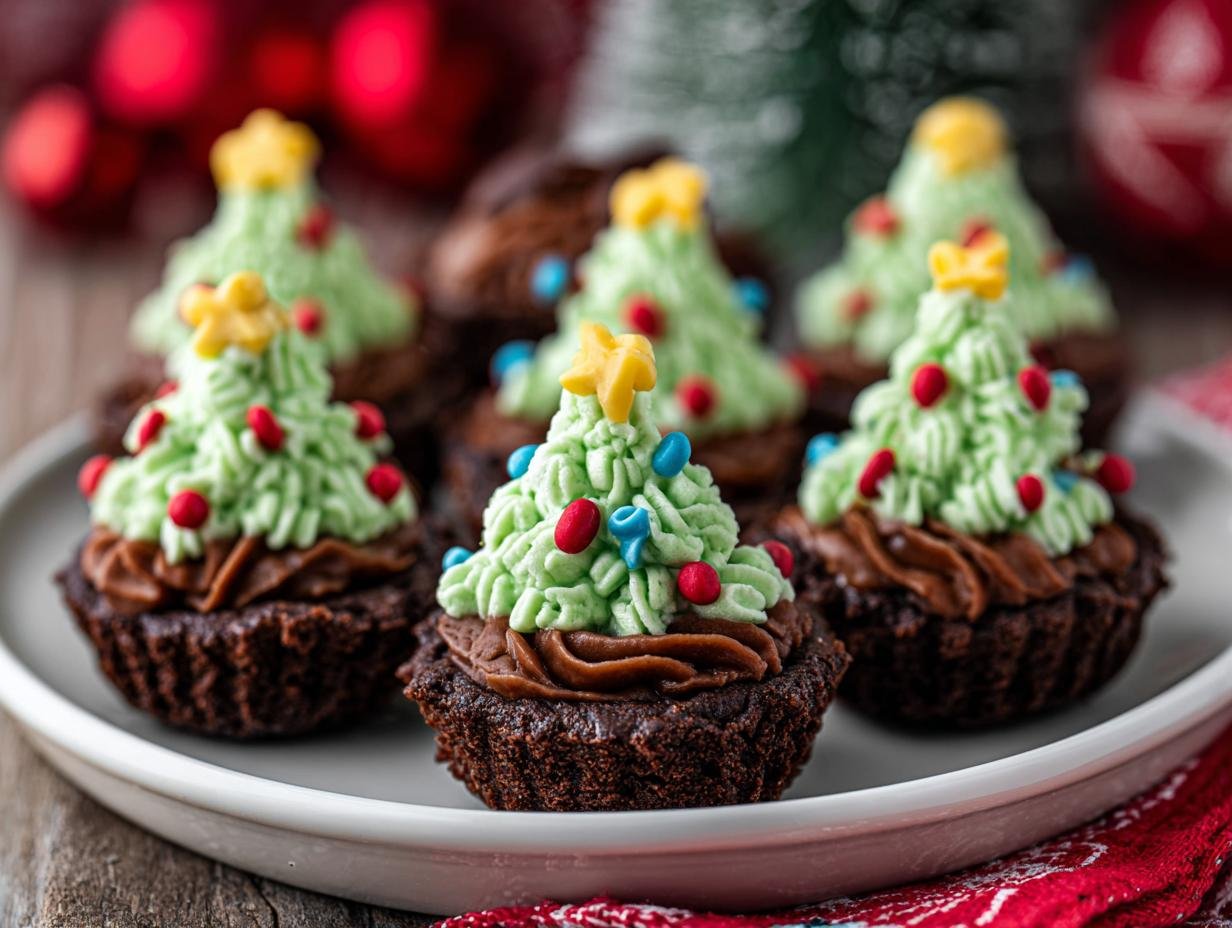
Brownie Cups Christmas Tree creations have become my absolute favorite holiday tradition! I remember the first time I saw them years ago – these adorable, bite-sized trees made of rich chocolatey goodness, sparkling with festive sprinkles. They just radiate holiday cheer! Making these brownie Christmas tree cups has brought so much joy into my kitchen, especially with my kids helping to pipe the frosting and decorate. The smell of warm brownies and sweet vanilla frosting fills the house, creating such a cozy atmosphere. They’re truly the easiest way to bring a smile to everyone’s face. Let’s get cooking!
Why You’ll Love These Brownie Cups Christmas Trees
These festive treats are a holiday must-have for so many reasons!
- The taste is pure chocolate bliss, with rich, fudgy brownies and creamy, sweet frosting.
- They’re incredibly quick to whip up, with a short prep time that’s perfect for busy holiday schedules.
- While decadent, they’re portion-controlled, making them a slightly more mindful indulgence.
- These Christmas tree brownie bites are budget-friendly, using a standard brownie mix and simple frosting ingredients.
- They are wonderfully family-friendly; kids adore helping to decorate these delightful treats.
- As adorable Christmas tree brownie bites, they’re guaranteed to be a showstopper at any party.
- The decorating process is almost as fun as eating them!
- They offer a delightful festive flair to any holiday gathering.
Ingredients for Your Holiday Brownie Tree Recipe
Gathering these ingredients is the first step to creating your show-stopping festive brownie cup desserts. You’ll be amazed at how a simple brownie mix transforms into these adorable trees!
- 1 box brownie mix (18 oz, e.g., Ghirardelli Double Chocolate) – This is the base for our fudgy brownie cups.
- Ingredients as listed on brownie mix (usually eggs, oil, water) – Follow the package directions for the perfect brownie batter consistency.
- 1 cup unsalted butter, softened – Essential for a creamy, stable buttercream frosting.
- 3 – 4 cups powdered sugar – The sweetness and structure of our frosting depend on this.
- 3 – 4 tablespoons heavy cream – Adds moisture and helps achieve a smooth, pipeable frosting.
- 1 tablespoon pure vanilla extract – For that classic, warm vanilla flavor that complements the chocolate.
- 1/4 teaspoon salt – Balances the sweetness and enhances the chocolate flavor.
- Green food coloring (Wilton leaf green recommended) – To achieve that perfect Christmas tree hue.
- Holiday sprinkles (including star sprinkles, nonpareils, colored sugar) – These are crucial for the festive tree decorations!
- Non-stick spray for pan – To ensure your brownie cups release easily.
How to Make Christmas Tree Brownie Cups
Making these adorable Christmas tree brownie cups is a fun process that brings holiday magic right into your kitchen. Follow these steps to create your own festive edible Christmas tree brownies!
- Step 1: Start by preheating your oven to 350°F (180°C). This ensures your brownies bake evenly.
- Step 2: Give your mini muffin pan a good spray with non-stick spray. Nobody wants their beautiful creations to stick!
- Step 3: Prepare the brownie mix according to the package directions. Usually, this involves adding eggs, oil, and water. Mix until just combined; overmixing can lead to tough brownies.
- Step 4: Spoon the brownie batter into each muffin cavity, filling them about ⅔ full. This allows them room to puff up slightly.
- Step 5: Bake for 15–17 minutes. You’re looking for the edges to be set and a toothpick inserted into the center to come out with moist crumbs attached – not wet batter.
- Step 6: This is where the cup shape happens! Immediately after taking them out of the oven, use the back of a rounded spoon to gently press an indent into the center of each brownie. This creates the perfect little holder for our frosting trees.
- Step 7: Let the brownies cool in the pan for about 10 minutes before carefully transferring them to a wire rack to cool completely. Patience here is key; frosting warm brownies will lead to a melty mess!
- Step 8: While the brownies cool, let’s make the frosting. Beat the softened butter on low speed until it becomes pale and fluffy. This usually takes a few minutes.
- Step 9: Gradually add the powdered sugar and heavy cream, alternating between them, and mixing on low speed. This prevents a sugar cloud in your kitchen!
- Step 10: Stir in the vanilla extract, salt, and your green food coloring. I love using Wilton’s leaf green for a vibrant tree color.
- Step 11: Turn the mixer up to high speed and beat for about 2 minutes until the frosting is smooth, creamy, and beautifully green. This is how to make brownie Christmas trees look like the real deal!
- Step 12: Fill a piping bag fitted with a closed star tip. If you don’t have a piping bag, a zip-top bag with a corner snipped off works too.
- Step 13: Pipe swirls of green frosting onto each cooled brownie cup, starting from the outside and working your way up to a point, mimicking a Christmas tree.
- Step 14: Decorate your frosted trees immediately with your favorite holiday sprinkles. Placing them while the frosting is still soft helps them stick perfectly. Now you have beautiful Christmas tree shaped brownies!
Expert Tips for the Best Christmas Tree Brownies
Achieving that perfect holiday charm with these treats is easy with a few insider tricks. These tips will elevate your Brownie Cups Christmas Tree from simple to spectacular!
- Cool your brownie cups completely before frosting. A warm brownie will melt your beautiful green buttercream, turning your festive trees into a green puddle.
- Use a piping bag with a closed star tip for the most authentic tree shape. It creates those lovely, defined layers that mimic real pine trees.
- Have your sprinkles ready to go before you start piping the frosting. The frosting is sticky for only a short time, so you need to decorate immediately.
- Don’t overmix the brownie batter. Gentle mixing ensures a tender, fudgy texture, which is key for a delicious base.
What’s the secret to perfect Brownie Cups Christmas Trees?
The real secret to a perfect best brownie cup Christmas tree lies in two things: creating that distinct cup shape right after baking and letting the brownies cool completely before frosting. This ensures your trees stand tall and proud!
Can I make Christmas tree brownie bites ahead of time?
Yes, you absolutely can! You can bake and cool the brownie cups a day in advance. Store them in an airtight container at room temperature. Frost and decorate them on the day you plan to serve them for the freshest look.
How do I avoid common mistakes with Holiday brownie tree recipe?
A common pitfall is frosting warm brownies, which melts the icing. Another is overmixing the batter, leading to tough brownies. Lastly, ensure your butter is softened, not melted, for the frosting to achieve the right consistency. For more baking tips, check out these testing the elements.
Best Ways to Serve Christmas Tree Shaped Brownies
These delightful Christmas dessert brownie cups are perfect for a holiday cookie exchange or a festive addition to your dessert table. For a truly stunning presentation, arrange them on a tiered stand alongside other holiday treats. They pair wonderfully with a tall glass of cold milk or a warm mug of spiced apple cider. You can also serve them as a charming individual dessert after a holiday meal, perhaps with a small scoop of vanilla bean ice cream for an extra decadent touch. These festive little trees are sure to be a hit!
Nutrition Facts for Brownie Cups Christmas Trees
These festive treats are as delightful to enjoy as they are to make. Here’s a breakdown of the estimated nutritional information per brownie cup, so you can savor them guilt-free!
- Calories: Approximately 250-300
- Fat: 12g
- Saturated Fat: 6g
- Protein: 3g
- Carbohydrates: 35g
- Fiber: 1g
- Sugar: 25g
- Sodium: 150mg
Nutritional values are estimates and may vary based on specific brownie mix and frosting ingredients used.
How to Store and Reheat Brownie Christmas Trees
Once your festive creations are complete, proper storage is key to keeping them looking and tasting their best. After carefully decorating brownie cups for Christmas, allow the frosting to set completely at room temperature, which usually takes about an hour. For short-term storage, place the cooled and decorated brownie cups in an airtight container or a cupcake carrier. They can be stored at room temperature for up to 3-4 days. If you need to store them longer, these delightful Christmas tree shaped brownies freeze beautifully! Wrap each brownie individually in plastic wrap, then place them in a freezer-safe bag or container. They’ll stay fresh in the freezer for up to 3 months. When you’re ready to enjoy them, simply thaw them overnight in the refrigerator. If you prefer them slightly warm, you can gently reheat them in a low oven (around 250°F or 120°C) for a few minutes, but be careful not to melt the frosting. For more information on storing baked goods, consider these barley the versatile grain tips, as proper storage techniques often apply broadly.
Frequently Asked Questions About Christmas Tree Brownie Bites
Got questions about whipping up these adorable holiday treats? I’ve got you covered!
Are these Brownie Cups Christmas Tree easy enough for beginners?
Absolutely! The base is a simple brownie mix, and the frosting is straightforward. The decorating is the fun part, and even if your trees aren’t perfect, they still look festive. These are genuinely edible Christmas tree brownies that anyone can master.
What if I don’t have a piping bag or star tip for my Christmas brownie tree decorating ideas?
No worries! You can use a zip-top bag. Spoon the frosting into the bag, seal it tightly, and snip off a small corner. You can also use a small spatula or even the back of a spoon to create a rustic, swirled tree shape. It all adds to the charm of your Christmas tree shaped brownies!
Can I use different flavors for my Christmas tree brownie bites?
Definitely! While the classic chocolate is amazing, feel free to experiment. You could use a vanilla or red velvet brownie mix. For the frosting, you could add a hint of peppermint extract or even a touch of cinnamon. The possibilities are endless for creating your own unique festive brownie cup desserts. Try adding some cinnamon orange jam for a twist.
How many Christmas tree brownie cups does this recipe make?
This recipe typically yields about 24 mini brownie cups, depending on how full you fill each cavity and the size of your mini muffin pan. This batch is perfect for sharing at a holiday gathering or making sure everyone gets a taste of these delightful Christmas dessert brownie cups.
Variations of Festive Brownie Cup Desserts
Once you’ve mastered the classic Brownie Cups Christmas Tree, you might want to explore some fun variations! These ideas can liven up your holiday baking and offer something for everyone.
- Dietary Adaptations: For gluten-free guests, use your favorite gluten-free brownie mix. You can also find vegan brownie mixes and use dairy-free butter alternatives and plant-based milk for the frosting to create dairy-free options. These simple swaps make your edible Christmas tree brownies accessible to more people.
- Flavor Twists: Enhance the chocolatey base by adding a teaspoon of espresso powder to the brownie batter, which intensifies the chocolate flavor. For the frosting, try adding a hint of peppermint extract or a touch of orange zest for a different festive aroma. These flavor additions offer new Christmas brownie tree decorating ideas.
- No-Bake Option: If you’re short on oven time, consider a no-bake brownie cup base. You can crush chocolate wafer cookies or graham crackers with melted butter and press them into mini muffin liners to form a crust. Top with a no-bake chocolate ganache or a simple chocolate frosting before decorating your trees.
- Mini Muffin Pan Alternative: If you don’t have a mini muffin pan, you can bake the brownies in a regular 8×8 or 9×13 inch pan and then cut them into squares or rounds. Use a cookie cutter to shape them into trees, or simply top the squares with frosting and sprinkles. This flexibility makes Christmas tree shaped brownies achievable with any equipment. For a different dessert idea, check out these apple pie recipes.

These delightful Christmas dessert brownie cups are perfect for a holiday cookie exchange or a festive addition to your dessert table. For a truly stunning presentation, arrange them on a tiered stand alongside other holiday treats. They pair wonderfully with a tall glass of cold milk or a warm mug of spiced apple cider. You can also serve them as a charming individual dessert after a holiday meal, perhaps with a small scoop of vanilla bean ice cream for an extra decadent touch. These festive little trees are sure to be a hit!
PrintBrownie Cups Christmas Tree: Joyful 24 Bites

Create festive and delicious Brownie Cups Christmas Trees for your holiday celebrations. These bite-sized treats feature fudgy brownie cups topped with green buttercream frosting shaped like mini Christmas trees, adorned with festive sprinkles. They are simple to make, perfect for kids to decorate, and sure to impress your guests.
- Prep Time: 30 minutes
- Cook Time: 17 minutes
- Total Time: 47 minutes
- Yield: 24 brownie cups 1x
- Category: Dessert
- Method: Baking
- Cuisine: American
- Diet: Vegetarian
Ingredients
- 1 box brownie mix (18 oz, e.g., Ghirardelli Double Chocolate)
- Ingredients as listed on brownie mix (usually eggs, oil, water)
- 1 cup unsalted butter, softened
- 3 – 4 cups powdered sugar
- 3 – 4 tablespoons heavy cream
- 1 tablespoon pure vanilla extract
- 1/4 teaspoon salt
- Green food coloring (Wilton leaf green recommended)
- Holiday sprinkles (including star sprinkles, nonpareils, colored sugar)
- Non-stick spray for pan
Instructions
- Preheat oven to 350°F (180°C).
- Spray a mini muffin pan with non-stick spray.
- Prepare the brownie mix according to the box instructions.
- Fill each muffin cavity ⅔ full with brownie batter.
- Bake for 15–17 minutes, or until the edges are firm and a toothpick comes out with moist crumbs.
- Immediately after baking, use the back of a rounded spoon to press an indent in the center of each brownie to form a cup.
- Let brownies cool in the pan for 10 minutes, then transfer to a wire rack to cool completely.
- To make frosting: Cream softened butter on low speed until pale and fluffy.
- Gradually add powdered sugar and heavy cream, alternating between the two, mixing on low speed.
- Add vanilla, salt, and green food coloring.
- Mix on high speed for 2 minutes until smooth and well combined.
- Fill a piping bag with frosting using a closed star tip.
- Pipe frosting in swirls to form tree shapes on each brownie cup.
- Immediately decorate with holiday sprinkles before icing sets.
Notes
- Cool brownies completely before frosting to avoid melting the buttercream.
- Use a closed star tip for the best tree shape.
- Add sprinkles right after piping to ensure they stick.
- Store in a cupcake carrier or airtight container at room temperature for up to 5 days.
- You can freeze undecorated brownie cups and frost them later.
Nutrition
- Serving Size: 1 brownie cup


Leave a Reply