
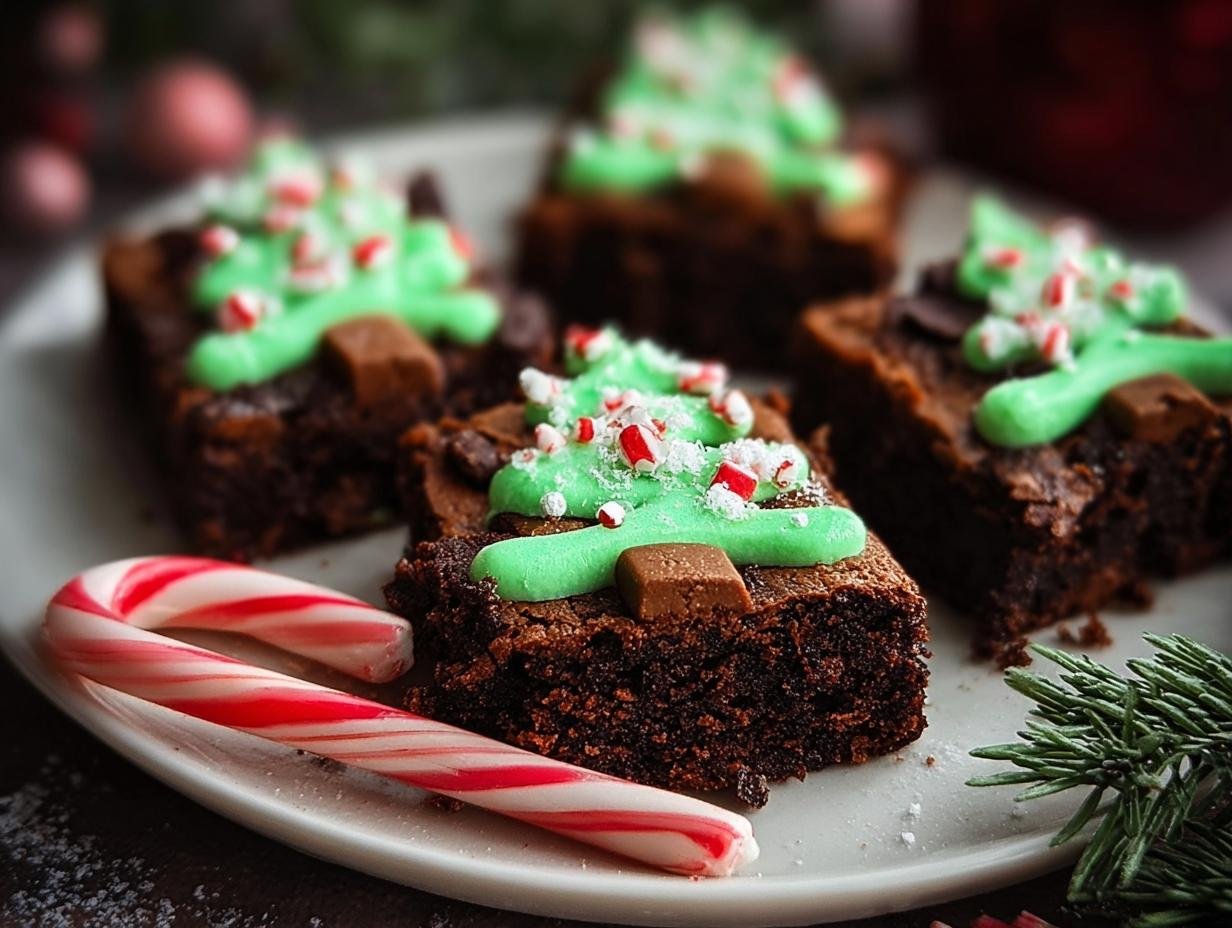
Christmas Tree Brownies have become my absolute favorite holiday treat to make and share. There’s something magical about transforming a simple brownie into a delightful edible decoration that just screams festive cheer. I remember the first time I tried making them with my niece; her eyes lit up as we piped on the green icing and sprinkled them with colorful candies, creating our own little edible forest. The rich chocolatey aroma filling the kitchen, combined with the sweet vanilla icing, makes these festive Christmas brownies a sensory delight that truly captures the holiday spirit. Let’s get baking!
Why You’ll Love These Christmas Tree Brownies
These delightful treats are a holiday must-have for so many reasons:
- They’re incredibly fun to make, especially with kids.
- The festive look is perfect for any holiday gathering.
- They use a simple brownie mix, making them easy Christmas tree brownies.
- The combination of rich chocolate and sweet vanilla icing is irresistible.
- They offer a fantastic canvas for creativity with various Christmas brownie decorating ideas.
- You can customize the green icing shade to your liking.
- These brownies are a guaranteed crowd-pleaser at parties.
- They bring a touch of edible whimsy to your dessert table.
Ingredients for Your Christmas Tree Brownie Recipe
Gathering your ingredients is the first step toward creating these adorable Christmas tree shaped brownies. You’ll be surprised how simple it is to transform a basic brownie mix into a festive masterpiece. Here’s what you’ll need:
- 1 box brownie mix – choose your favorite kind for the rich chocolate base
- 1 tub white vanilla icing – this is our canvas for the tree’s greenery
- Green food coloring (40–50 drops) – gel coloring gives a richer hue, but liquid works too!
- Small round sprinkles – for classic tree ornamentation
- Small star sprinkles – the perfect topper for each brownie tree
- Candy canes (broken into 1.5-inch pieces) – these create the sturdy trunks for our trees
- Aluminum foil (for lining the pan) – helps with easy removal
- Cooking spray – to prevent sticking to the foil
How to Make Christmas Tree Brownies
Let’s get down to the fun part of how to make Christmas tree brownies! It’s a straightforward process that yields incredibly festive results. Follow these steps, and you’ll have a delightful batch of edible holiday decorations in no time.
- Step 1: Preheat your oven to the temperature specified on your brownie mix box, usually around 350°F (175°C). Prepare an 8-inch by 8-inch baking pan by lining it with aluminum foil, making sure to leave some overhang for easy removal. Lightly spray the foil with cooking spray. Pour your prepared brownie batter into the pan, spreading it evenly. Bake according to the package directions, typically for 30-35 minutes, or until a toothpick inserted into the center comes out with moist crumbs attached. The aroma of baking chocolate will fill your kitchen – a sure sign of deliciousness to come!
- Step 2: Once baked, carefully remove the brownies from the pan using the foil overhang. Let them cool completely on a wire rack for at least 1.5 to 2 hours. This cooling time is crucial for clean cuts. Once cooled, use a sharp knife to cut the brownies into triangle shapes, aiming for a tree-like form. Break your candy canes into roughly 1.5-inch pieces. Gently insert one candy cane piece into the bottom edge of each brownie triangle to serve as the tree trunk.
- Step 3: While the brownies are cooling, prepare your green icing. Take about half of the tub of white vanilla icing and place it in a small bowl. Add green food coloring, starting with about 40-50 drops. Stir thoroughly until you achieve a vibrant, uniform green color that reminds you of a Christmas tree. Spoon this colored icing into a zip-top bag. Snip off a tiny corner of the bag to create a piping nozzle.
- Step 4: Now for the decorating! Hold the piping bag filled with green icing and pipe zigzags from the top of each brownie tree down to the bottom, mimicking the branches of a Christmas tree. This is where your Christmas tree brownie tutorial comes to life! Immediately after piping, decorate each tree with small round sprinkles and finish by placing a star sprinkle at the very top. These decorative touches really bring your Christmas tree shaped brownies to life.

- Step 5: Allow the icing to set completely before you attempt to store or serve your beautiful Christmas tree brownies. This usually takes about 30 minutes to an hour, depending on the humidity. Once set, they are ready to be enjoyed or stored for your holiday parties.
Pro Tips for the Best Christmas Tree Brownies
Want to elevate your brownie game for the holidays? These little tricks will ensure your Christmas tree brownies are a showstopper.
- For super clean cuts, chill your baked brownies in the refrigerator for at least 30 minutes before shaping them into triangles.
- Using gel food coloring will give you a more vibrant green icing with fewer drops, preventing the icing from becoming too thin.
- Insert the candy cane trunks *before* you pipe the icing. This helps the trunk stay put and prevents smudging the green frosting.
- If you’re stacking them for storage, place a small piece of parchment paper between each decorated brownie to protect the icing.
What’s the secret to perfect Christmas tree brownies?
The real secret to the best Christmas tree brownies lies in chilling the brownies before cutting. This makes them firm enough to slice into clean triangles without crumbling, ensuring each tree has a perfect shape. For more baking tips, check out this guide on versatile grains.
Can I make Christmas tree brownies ahead of time?
Absolutely! You can bake the brownies and cut them into shapes a day in advance. Store them in an airtight container at room temperature. Decorate them the day you plan to serve them for the freshest look, or up to 24 hours ahead if you’re careful with storage.
How do I avoid common mistakes with Christmas tree brownies?
A common pitfall is cutting warm brownies; always let them cool completely! Also, be careful not to over-mix the green food coloring into the white icing, which can make it too thin. For rich chocolate Christmas tree brownies, ensure your base is well-cooled before decorating. Learn more about the benefits of common ingredients.
Best Ways to Serve Your Festive Christmas Brownies
These adorable Christmas tree brownies for parties are so versatile! They make a stunning centerpiece on a dessert platter, adding a touch of whimsy and color. For a truly impressive spread, arrange them alongside other holiday treats like Linzer cookies or gingerbread men. You can also serve them individually with a small dollop of whipped cream or a dusting of powdered sugar for an extra touch of elegance. They pair wonderfully with a warm mug of hot cocoa or spiced apple cider, making them perfect for a cozy holiday gathering.
Nutrition Facts for Christmas Tree Brownies
Here’s a breakdown of the estimated nutritional information per serving for these delightful Christmas tree brownies:
- Calories: 250
- Fat: 12g
- Saturated Fat: 4g
- Protein: 3g
- Carbohydrates: 34g
- Fiber: 1g
- Sugar: 25g
- Sodium: 150mg
Nutritional values are estimates and may vary based on the specific brownie mix and icing used. For more information on healthy eating, consider looking into sustainable farming practices.
How to Store and Reheat Christmas Tree Brownies
Once your beautiful Christmas tree brownies are decorated and the icing has set, you’ll want to store them properly to keep them looking and tasting their best. If you’re making these Christmas tree brownies from scratch (or from a mix!), proper storage is key. After they’ve cooled completely, place them in a single layer in an airtight container. If you need to stack them, put a piece of parchment paper between each layer to prevent the icing from sticking and smudging the festive designs. Store them at room temperature for up to 3-4 days. For longer storage, these brownies freeze wonderfully. Wrap them tightly in plastic wrap, then in a layer of aluminum foil, and freeze for up to 3 months. To reheat, simply bring them to room temperature for about 30 minutes before serving. They’re a fantastic make-ahead treat!
Frequently Asked Questions About Christmas Tree Brownies
What are Christmas tree brownies?
Christmas tree brownies are a fun and festive holiday dessert made by cutting brownies into triangle shapes and decorating them to look like Christmas trees. They typically use green icing and sprinkles, often with a candy cane trunk, making them a playful and edible holiday decoration.
Why make Christmas tree brownies?
You should make these brownies because they’re incredibly easy to whip up, especially using a brownie mix, and they look so impressive! They’re perfect for holiday parties, bake sales, or just a fun activity to do with the kids. The combination of rich chocolate brownie and sweet green frosting is a guaranteed hit with everyone.
Can I use a different type of brownie mix?
Yes, absolutely! While the recipe calls for a standard brownie mix, feel free to use a fudgy, chewy, or even a gluten-free brownie mix. The key is to ensure the brownies bake up firm enough to be cut into shapes without crumbling. You might need to adjust baking time slightly based on the mix you choose.
What if I don’t have star sprinkles?
No worries if you’re missing star sprinkles! You can use any small, festive sprinkle for the tree topper. Gold or silver nonpareils, a small dollop of extra white icing, or even a tiny piece of a candy cane can work beautifully as a tree topper. Get creative with what you have on hand!
Variations of Christmas Tree Brownies You Can Try
Looking to mix things up or cater to specific needs? These Christmas tree brownies are incredibly adaptable! For a healthier twist, try using a whole wheat or gluten-free brownie mix, or even a black bean brownie recipe for a surprising, nutrient-dense base. If you’re short on time, remember these are already easy holiday tree brownies, but for a no-bake option, you could crumble cooled brownies and mix them with a little frosting to form balls, then shape and decorate them like mini trees. You can also experiment with different frosting flavors or even add a touch of peppermint extract to the green icing for a festive flavor boost. For an extra special touch, consider adding more decorative elements like edible glitter or mini chocolate chips to your Christmas tree brownies with frosting.
PrintChristmas Tree Brownies: 1 Magical Treat

Create adorable Christmas Tree Brownies using a simple brownie mix, green icing, and candy canes. These festive treats are perfect for holiday parties and fun to decorate with kids.
- Prep Time: 15 minutes
- Cook Time: 30 minutes
- Total Time: 1 hour 45 minutes
- Yield: 12 brownies 1x
- Category: Dessert
- Method: Baking
- Cuisine: American
- Diet: Vegetarian
Ingredients
- 1 box brownie mix
- 1 tub white vanilla icing
- Green food coloring (40–50 drops)
- Small round sprinkles
- Small star sprinkles
- Candy canes (broken into 1.5-inch pieces)
- Aluminum foil (for lining the pan)
- Cooking spray
Instructions
- Preheat oven and prepare brownie mix according to package instructions. Line an 8″x8″ baking pan with aluminum foil and spray with cooking spray. Pour brownie batter into pan and bake as directed. Allow brownies to cool completely for at least 1.5 hours.
- Remove brownies from pan and cut into triangle shapes. Break candy canes into 1.5″ pieces and insert into the bottom of each triangle to form the tree trunk.
- Mix half a tub of white icing with green food coloring until desired shade is reached. Spoon green icing into a zip-top bag and snip off a corner.
- Pipe icing in zigzag pattern from top to bottom of each triangle. Decorate with sprinkles and top each tree with a star sprinkle.
- Let icing set before storing or serving.
Notes
- Use gel food coloring for a more vibrant green with less liquid.
- Chill brownies before cutting to get cleaner triangle shapes.
- Add trunks before icing to avoid smudging.
- Store in a single layer or with parchment between layers to prevent icing damage.
- Great make-ahead treat; icing hardens overnight.
Nutrition
- Serving Size: 1 brownie


Leave a Reply